If you’ve found this post, it’s likely you already know what the PnP Starter Kit is. However, if you do not, I’ve written a quick starter post about it here. The PnP Starter Kit is an open source initiative that provides an end to end solution for provisioning pre-built sites, web parts, extensions, site designs and more in an Office 365 environment.
While it really is an exhaustive example of how this can be done, many people are hoping to augment the solution to suit their own business needs. Because of this, I am going to start a series about how to configure and change certain aspects of the starter kit. In this post, we’ll talk about how to modify the footer in the hub site, aka “Portal Footer”.
The Portal Footer is the orange bar (highlighted in red) at the bottom this image.

The portal footer is an expanding footer that allows for showing standard company links and supports personalized links for the current logged in user. The personal links are stored in a property on the User Profile that needs to be created by an admin. Instructions to do so can be found on the GitHub repository at this page.
Here what the footer looks like expanded.

You’ll notice there are columns with a list of links inside. They are grouped by “Applications”, “Internal Modules”, “News” and “My Links” (the links that are held on the user profile). The “Applications”, “Internal Modules” and “News” group of links are stored within a SharePoint list on the portal site in a list called “PnP-PortalFooter-Links”, which are deployed automatically with the Starter Kit. If you navigate to the list https://yoursite.sharepoint.com/sites/YourSitePrefix/Lists/PnPPortalFooterLinks/AllItems.aspx you will be able to see and modify the existing links and link groups that show in the footer.
Modify a company wide link in the footer
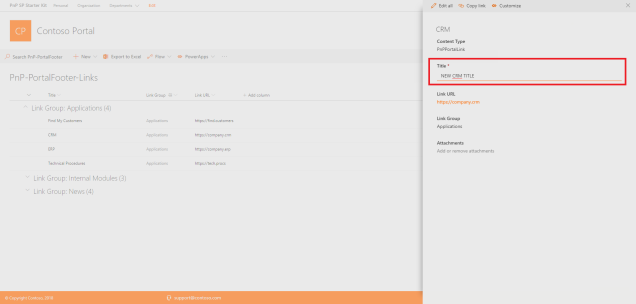
To modify an existing link in the footer, all you need to do is edit one of the links in the PnPPortalFooterLinks list. Let’s do that now. I am going to open up the CRM link item under “Applications” and change the title from “CRM” to “NEW CRM TITLE”.
Once I save the item, and reload the page and expand my footer, I’ll see my new title.

Permission the portal link items
While I rarely recommend item level permissions, there are times where this may make sense. Generally speaking, item level permissions can make it hard for IT staff members to manage what content users have access to in SharePoint. Also, in a list with many items, item level permissions become a performance concern. However, in the case of this links list, it’s unlikely we’ll have that many items so it should be fairly easy to manage.
The footer link can only access items in a list that the current logged in user has access to, thus allowing us to show or hide links to specific users. Let’s say that the ERP application in the “Applications” group should only be visible to a specific ERP team. Using out of the box permission, we can remove access and grant permissions to the item for that team only.
Add my own personal links
As previously mentioned, the portal footer allows for users to create and link to their favorite locations that they access the most. To do this, expand the footer using the arrows on the right. You’ll see the ability to add and edit the links on your profile.

If you are a SharePoint admin, you can navigate to the User Profiles in the SharePoint Admin center and see the values for links that users are storing on their profiles.

Update company name
If you look at the footer, you’ll notice it has a copyright for Contoso 2018 and also has a help desk link to support@contoso.com. Changing these values is the most common request I have seen from users who have tested out the starter kit and want to use these extensions. In order to do this, we actually need to modify the PnP Provisioning template provided with the solution because these values aren’t stored anywhere in SharePoint.
If you have downloaded/cloned the repository, navigate to the provisioning folder and open up the hubsite.xml file. This is the template that defines the structure of the portal site. It includes all of the pages, the navigation, the web parts and identifies which application customizers will load for this site. Towards the bottom of the file you will see an XML node called <pnp:CustomActions>, inside it defines the Portal Footer properties.

Let’s say I want to change the values highlighted in red that correspond to the Copyright and Help link in the footer. My fictional company is Cameronsoft and we manufacture fake widgets, so I definitely want to have my company’s name in the footer at all times. I will change these values in the template.xml before deploying the PnP starter kit.

Now, if i deploy the starter kit, my company’s information will be listed at the bottom instead of Contoso!

Updating an already deployed footer
Let’s say you’ve deployed the footer but you didn’t realize that it would be labeled with Contoso. I wouldn’t try to re-deploy the starter-kit, because you may find complications with that. So here is a set of PowerShell scripts to help you do so. Using PnP, you’ll need to connect to the hub site and remove the existing portal footer, and re-add a new one with new properties.
Connect-PnPOnline https://yoursite.sharepoint.com/sites/demositeportal
Remove-PnPCustomAction -Identity "PortalFooter"

Add-PnPCustomAction -Name "PortalFooter" -Title "PortalFooter" -ClientSideComponentId b8eb4ec9-934a-4248-a15f-863d27f94f60 -Location "ClientSideExtension.ApplicationCustomizer" -ClientSideComponentProperties "{""linksListTitle"":""PnP-PortalFooter-Links"",""copyright"":""@Copyright CameronSoft, 2018"",""support"":""support@cameronsoft.com"",""personalItemsStorageProperty"":""PnP-CollabFooter-MyLinks""}"
We start by connecting to the hub site using Connect-PnPOnline.
Then we remove the application customizer with the name “PortalFooter”. Followed up by Add-PnPCustomAction. Notice, the clientsidecomponentproperties is a JSON object that defines the values on the footer. Just update these to include your company instead of Constoso!
Modify Footer code
You may find the footer isn’t displayed exactly how you like, or you want to add your own custom functionality. Well, no problem there! This is an open source project and you are free to change anything you like. To find the footer code, open your sp-starter-kit folder in VS Code and navigate to /solution/src/extensions/portalfooter. This is where you can modify the code to suite your needs. Once complete, just rebuild and package the solution then upload it to your app catalog! Instructions on SPFx and how to build and deploy apps can be found here.
Final Comments
I hope you find this post helpful. As I mentioned, I am going to be doing a short series on this for those of you who wish to customize or change the PnP Starter kit. If you have any questions, I suggest going to the GitHub repository first. Eric Overfield has done a fantastic job producing documentation for this solution. If you can’t find what you are looking for, you can ask a question in the issues list or you can just comment on this post and I’d be happy to help!
