Exploring the Microsoft Graph SDK: What’s Under the Hood

Microsoft Graph has become the backbone of modern Microsoft 365 development, but how you interact with it can make a big difference in your productivity, app performance, and code maintainability. Microsoft’s official SDK for working with Graph, @microsoft/msgraph-sdk, is a TypeScript-based library that offers a consistent, fluent API surface for interacting with Microsoft Graph endpoints across services like Users, Drives, and Mail.

Recently, there was an episode on the Code.Deploy.Go Live. podcast with Julie Turner and Andrew Connell, which discussed some initial concerns with the Microsoft Graph SDK. So, I decided I would spend more time with the SDK to understand how it’s designed, how it performs in real-world usage, and what developers can expect when building modern web applications with it.

If you just want the conclusions, scroll down to Investigation: What I Found. Otherwise, let’s get hands-on.

Getting Hands-On

To get a feel for the SDK, I built a simple SharePoint Framework (SPFx) web part that fetches a list of users from Microsoft Graph. The goal was to evaluate both the developer experience and the architectural trade-offs involved.

Using @microsoft/msgraph-sdk

Initial Configuration

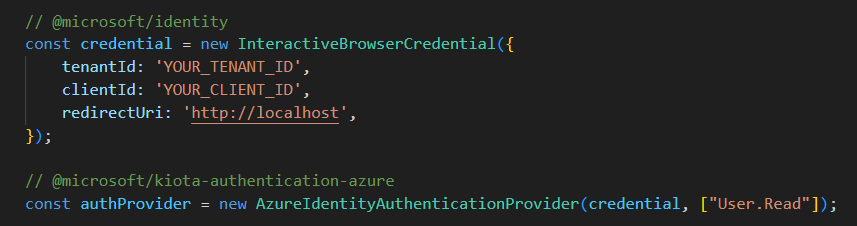
To start, I am going to import an InteractiveBrowserCredential, this is because I am building a Single Page Application.

Calling into APIs

I need to install the API package that I want to be working this. In this case, I wanted to work with Users.

npm install @microsoft/msgraph-sdk-users

Setting it up

Next I will import a client and a RequestAdapter from the core @microsoft/msgraph-sdk package and the API specific package for working with Users.

Once these have been imported, I can now create new instances of a GraphRequestAdapter and the ServiceClient using the authProvider I created earlier.

Now that this is completed, I can start working on calling the APIs using that same graphServiceClient.

And voila, I’m done. The coding experience is nice. The SDK is fluent and logical, the IntelliSense is handy for any developer.

Investigation: What I found

At first glance, the SDK provides everything you’d expect… structured setup and very good intellisense. However, after testing and examining the build output more closely, I noticed a few concerns.


Bundle Size Considerations

One of the first things that stood out during testing was the bundle size, which Julie and Andrew discussed in their podcast. Even for relatively simple Graph operations (like fetching users), the resulting bundle was noticeably larger than expected for front-end applications.

To put this into perspective, to do a /users call in PnPjs (another popular Microsoft Graph SDK), the resulting bundle size is 1/10th the size, or 262KB.

This comes down to how the Microsoft Graph SDK is architected. The Microsoft Graph SDK is built on top of Kiota, Microsoft’s code generation framework. Kiota provides:

  • A core runtime (@microsoft/kiota-http-fetch, @microsoft/kiota-abstractions, etc.) to handle request building, serialization, and response parsing.
  • Authentication adapters (@microsoft/kiota-authentication-azure, @azure/identity) that integrate with Microsoft Entra and Azure Identity flows.
  • Generated API modules (like @microsoft/msgraph-sdk-users), which import the full endpoint surface area.

Code generation tools come in many flavors and patterns, and many of them fall victim to the same issues… a codebase that is bloated, heavy and inflexible. That’s not to say the Microsoft Graph SDK is all of these things, in fact, Microsoft did a fantastic job making sure the SDK is opinionated where it matters, but still flexible to allow developers to build and extend it. However, if you peak into the codebase itself, you’ll start to notice a pattern…. layers upon layers of abstraction and significant amounts of duplicate code.

Each API endpoint is isolated and fully self-contained. This means each endpoint implements it’s own request builder, including it’s own query parameter mappings, error mappings, serialization logic, and full request metadata for GET/POST/{} operations.

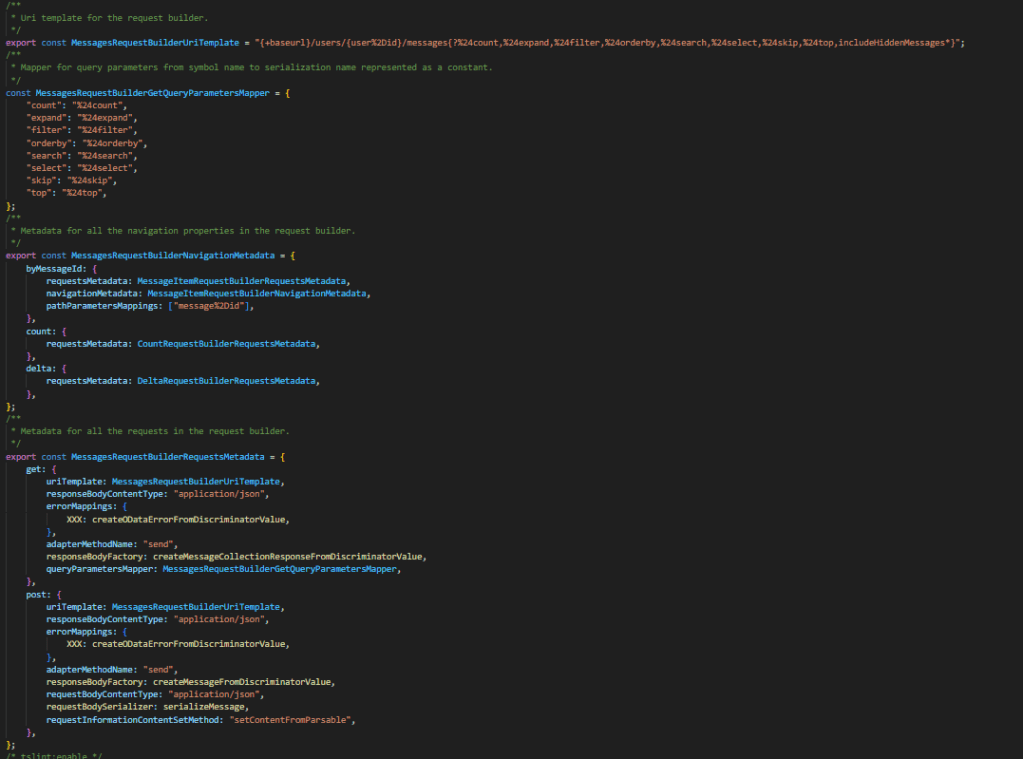
If you take a look at this code which is for the /users/{id}/messages endpoint. You have a full request builder which defines the entire endpoint. It defines what metadata exists on a request, which OData operators are supported, etc. Every endpoint will have the same exact structure, even if, for example, the same QueryParameters exist on that other endpoint. It will be duplicated.

It took me nearly 3 minutes to bundle my SPFx solution when I added the @microsoft/msgraph-sdk-users package. 🥺

This is a big reason for the large bundle sizes. The SDK is very verbose if you’re going to use it as-is, however, this can be improved. Which leads me to the next part….


A “convenience” SDK and a different approach to SDK consumption

I posted my initial thoughts of this blog into a LinkedIn post. Sebastien Levert (Microsoft Graph) replied to my post and said some things that I thought were interesting, but also initially concerning.

He stated:

Kiota supports native endpoint selection to build your own API clients. The “Graph SDK” is provided for convenience and will only bundle the packages you really need (we split them across 70+ packages). So you have this opportunity to split at the operation level, the base routes and to include all of it. I’m happy to have a deeper chat on our design choices!

That being said, I understand it’s a big shift from the previous version and we are conscious there will be a transition period. We had really good results with other languages and think this approach is much more repeatable and reduce significantly the efforts required to maintain all languages vs. having special approaches per language.


As I read this, I don’t think he disagreed with anything I stated, but he did supply some really helpful foundational information into the reasoning for the way things are built as they are. (If you’re interested in learning more Darrel Miller did a great session on this, you can watch on Youtube).

Split at the operation level

Remember when I said that each API endpoint is isolated and fully self-contained? This architecture was intentional. The way the SDK is built (separate and fully encapsulated RequestBuilders), allows Kiota to generate versions of the Microsoft SDK using only the individual endpoints you wish to use.

That is, if you find the bundle sizes too large from the 70+ npm packages Microsoft ships for convenience, you can actually create your own using Kiota and include only the endpoints you want. This will greatly reduce the overall bundle sizes of your solution.

In fact, this is the recommendation by Microsoft. The Microsoft Graph API is HUGE. While I personally believe there is a lot of overhead and duplicate code due to Kiota, a large part of the problem of shipping a feature rich SDK on Graph, is that there are just a lot of endpoints to include. In PnPjs, we solve this problem with selective imports.

If you’re looking to learn how about to use Kiota to generate your own SDK, check out Vincent Biret’s demo.

Convenience?

This leads into my final concern. Convenience. Now, I’m taking the term convenience too literally, I know this. Convenience in the original context was “it’s there if you need to use it, but the recommendation is to use Kiota”. So bare with me as I stretch this out a bit…

The point of an SDK is to make it easier for developers to build on top of something that already exists. Without an SDK, you’re left wiring everything by hand and reading raw API docs. For many developers, installing the Microsoft Graph SDK from npm just works: they can call graphClient.users.get() and move on.

But here’s the catch: If you’re not careful, you’re inflating your bundle sizes without even realizing it. Which is why the Kiota approach, splitting at the operation level, exists. You can generate your own SDK tailored to your exact needs.

It sounds great in theory… but let’s be honest, how many developers will actually go through the process of generating a custom SDK to shave off the bundle size? It’s less “install and go” and more “install, generate, configure, integrate.”

So this sort of takes away from the convenience I normally associate with using an SDK… though, it’s still easier than writing everything yourself.


Closing thoughts

I want to be clear… this blog isn’t about knocking the Microsoft Graph SDK. It’s a solid, fully-supported library, and for enterprises that need official backing or can’t use third-party or open-source tooling, it’s a reliable choice. Kiota alone, is an impressive feat of engineering that makes creating your own SDK’s from OpenAPI defined APIs much easier than writing them yourself.

Ultimately, the takeaway is this: Microsoft’s Graph SDKs are designed to cover every scenario out-of-the-box, which is convenient but comes with trade-offs. Kiota gives you tools to optimize, but at the cost of some extra setup. If bundle size and control matter, generating a custom SDK with Kiota or looking towards other open-source SDKs is the way to go.

Hopefully this post was helpful. Maybe, if anything, it gives you some things to think about before installing any package from NPM (Microsoft Graph SDK or otherwise).

Series – Working with (Hidden) APIs that power SharePoint Knowledge Agents

Improve This Site Feature

With the rollout of Microsoft Copilot and the SharePoint Knowledge Agent, we’re starting to see more advanced AI-driven insights show up across modern SharePoint sites. One such set of features is under the “Improve this site” prompt, which surfaces recommendations like fixing broken links, retiring old pages, or identifying content gaps.

What most folks don’t realize is these suggestions are backed by hidden APIs (thanks Microsoft) that power the Knowledge Agent’s insights. In this post, I’ll walk you through how to interact with these APIs directly so you can integrate, debug, or automate them as needed.


One thing to understand early on: the SharePoint Knowledge Agent runs per site. That means each site collection evaluates and stores its own recommendations in isolation. If you’re an admin or developer looking to manage multiple sites across a hub or tenant, you’re going to be severely disappointed.

Let’s say you want to find all broken links across every marketing site in your org or retire outdated content from dozens of other sites. There’s no out-of-the-box way to do that centrally. Which, is really frustrating.

By using the APIs that power Knowledge Agent, you can build custom dashboards or admin tools that:

  • Query and aggregate missing link reports across multiple sites
  • Automate page retirement policies using Power Automate or Azure Functions
  • Surface content quality issues without requiring site owners to manually check each site

If you’ve ever built custom inventory tools for SharePoint before, this should feel familiar.

As always, these are undocumented APIs and their usage likely won’t have much support from Microsoft.


Prerequisites

Before diving in, make sure the following are true for your environment:

  1. You have Copilot licensing enabled.
  2. The EnsureMissingLinksFeature is activated. You can enable it with the following API call:
fetch("https://tenant.sharepoint.com/_api/sitemanager/EnsureMissingLinksListFeature", {
method: "POST",
headers: {
"accept": "application/json;odata=verbose",
"content-type": "application/json;odata=verbose",
"x-requestdigest": "<yourRequestDigest>"
},
credentials: "include"
});

Fix Broken Links

The Fix Broken Links functionality identifies links on your site that no longer resolve. This is a POST request that takes a payload with maxCount and snoozedLinks as parameters. The response should provide you with the top maxCount links in your site pages which are bad or invalid links!

fetch("https://tenant.sharepoint.com/_api/sitemanager/TopMissingLinks", {
  method: "POST",
  headers: {
    "accept": "application/json;odata=verbose",
    "content-type": "application/json;odata=verbose",
    "x-requestdigest": "<yourRequestDigest>"
  },
  body: JSON.stringify({
    maxCount: 6,
    snoozedLinks: ""
  }),
  credentials: "include"
});

Sample Response

{
  "d": {
    "TopMissingLinks": {
      "MissingLinks": {
        "results": []
      }
    }
  }
}

If there are broken links, they will appear in the results array.


Retire Inactive Pages

This feature identifies pages that haven’t seen much activity and lets you retire them. Retired pages are:

  • Deprioritized in search and Copilot experiences
  • Display a banner noting the content may be outdated

Get Retirable Pages

fetch("https://tenant.sharepoint.com/_api/sitemanager/RetirablePages", {
  method: "POST",
  headers: {
    "accept": "application/json;odata=verbose",
    "content-type": "application/json;odata=verbose",
    "x-requestdigest": "<yourRequestDigest>"
  },
  body: JSON.stringify({
    top: 6,
    isDebug: false,
    snoozedPaths: ""
  }),
  credentials: "include"
});

The response includes a list of page metadata. Each result includes properties like Title, Path, LastActivityTimestamp, and a thumbnail image.

If you’re curious where this property is stored… it’s tracked on the Site Pages library using a hidden column named _SPIsRetired.

How to Retire a Page

There are two main steps:

  1. Ensure the retire feature is enabled
  2. Set the _SPIsRetired field on the page to true

Step 1 – Enable Retire Page Feature

fetch("https://tenant.sharepoint.com/_api/sitemanager/EnsureRetirePageFeature", {
  method: "POST",
  headers: {
    "accept": "application/json;odata=verbose",
    "content-type": "application/json;odata=verbose",
    "x-requestdigest": "<yourRequestDigest>"
  },
  credentials: "include"
});

Step 2 – Update the Page Metadata

Use the ValidateUpdateListItem endpoint:

fetch("https://tenant.sharepoint.com/_api/web/getlistitemusingpath(DecodedUrl='/SitePages/WhoWeAre.aspx')/ValidateUpdateListItem", {
  method: "POST",
  headers: {
    "accept": "application/json;odata=verbose",
    "content-type": "application/json;odata=verbose",
    "x-requestdigest": "<yourRequestDigest>"
  },
  body: JSON.stringify({
    formValues: [
      {
        FieldName: "_SPIsRetired",
        FieldValue: "true"
      }
    ]
  }),
  credentials: "include"
});

Step 3 – Publish the Page

After updating the metadata, be sure to publish the page:

fetch("https://tenant.sharepoint.com/_api/web/getfilebyserverrelativepath(DecodedUrl='/SitePages/WhoWeAre.aspx')/Publish", {
  method: "POST",
  headers: {
    "accept": "application/json;odata=verbose",
    "x-requestdigest": "<yourRequestDigest>"
  },
  credentials: "include"
});

Once published, users visiting the page will see a warning banner indicating the page is no longer maintained.


Where to See All Retired Pages

There’s also a special view in the Site Pages library that lets you filter for retired content:

https://tenant.sharepoint.com/site/mysite/sitepages/forms/byauthor.aspx?viewid=af57819e-cb3e-443d-9517-b1ee5dd499d8


Final Thoughts

While most users only see the polished UI that Copilot and SharePoint surfaces, behind the scenes is a powerful and mostly hidden set of APIs driving these insights. I hope this post helped shed light on how these features actually work and how you can hook into them directly.

In future posts, I’ll explore how to surface Content Gaps across your sites using these same hidden APIs.

As mentioned, these are undocumented and YMMV if you are incorporating them into your own products.

Enable ratings on SharePoint Lists with the REST API

A question came up recently in one of my GitHub repositories where someone was wondering if you could enable ratings on a SharePoint list via the REST API.

After a bit of research, I found an undocumented (use this at your own risk!) API. The Microsoft API has an endpoint listed under the root _api folder named Microsoft.SharePoint.Portal.RatingSettings.SetListRating.

This endpoint requires a POST request and takes two parameters: listID and ratingType (1 = Star Ratings, 2=Likes)

Enable Ratings “Likes”


fetch("https://yourtenant.sharepoint.com/sites/yoursite/_api/Microsoft.SharePoint.Portal.RatingSettings.SetListRating?listID='6b847372-cf23-4bbf-87b1-72ca6c8a4bc1'&ratingType=2", {
  "headers": {
    "accept": "application/json",
    "accept-language": "en-US,en;q=0.9",
    "cache-control": "max-age=0",
    "content-type": "application/json;odata=verbose;charset=utf-8",
    "if-match": "*",
    "x-http-method": "MERGE",
    "x-requestdigest": "<YourRequestDigest>"
  },
  "referrerPolicy": "strict-origin-when-cross-origin",
  "body": null,
  "method": "POST",
  "mode": "cors",
  "credentials": "include"
});

Enable Ratings “Star Ratings”


fetch("https://yourtenant.sharepoint.com/sites/yoursite/_api/Microsoft.SharePoint.Portal.RatingSettings.SetListRating?listID='6b847372-cf23-4bbf-87b1-72ca6c8a4bc1'&ratingType=1", {
  "headers": {
    "accept": "application/json",
    "accept-language": "en-US,en;q=0.9",
    "cache-control": "max-age=0",
    "content-type": "application/json;odata=verbose;charset=utf-8",
    "if-match": "*",
    "x-http-method": "MERGE",
    "x-requestdigest": "<YourRequestDigest>"
  },
  "body": null,
  "method": "POST",
  "mode": "cors",
  "credentials": "include"
});

A quick reminder…

As mentioned previously, this is an undocumented API and I’ll probably get yelled at for promoting it! 🙂 So please, use this at your risk as you won’t be provided any support from Microsoft if you implement this.

Add comments to SharePoint list items using the REST API

One of the newest features to come to SharePoint Online is the ability to add comments within the activity panel on SharePoint list items. In a previous post, I talked about how we can retrieve these new comments using the SharePoint REST API.

List comments are a great new way for users to collaborate together on list items as users can have threaded conversations with one another.

In the past we would have used a multi-line text column with “append changes” to create threaded conversations on list items. The problem with this is this method creates new versions and those comments are difficult to retrieve programmatically. Please see my post on retrieving values in multi-line text fields more efficiently.

Add a comment using the REST API

Recently, I’ve been seeing more posts on support forums and in social asking how these comments can be accessed and created programmatically. Well, like most things in the modern interface, they are implemented using client-side code, which must mean there is a REST API backing the functionality.

You will need to execute a POST request to the following endpoint

Endpoint https://yourtenant.sharepoint.com/sites/ContosoGroup/_api/web/lists/GetByTitle(“<YourListName>&#8221;)/items(<ItemId>)/Comments()

Parameters – The parameter you will pass through the body is called “text”. Construct your JSON object as {“text”:”your sample comment”}

fetch("https://yourtenant.sharepoint.com/sites/ContosoGroup/_api/web/lists/GetByTitle('Test')/items(<ItemId>)/Comments()", {
"headers": {
"accept": "application/json;odata=verbose",
"content-type": "application/json;charset=UTF-8",
"x-requestdigest": "<yourRequestDigest""
},
"body": "{\"text\":\"Add a new comment\"}",
"method": "POST",
"mode": "cors",
"credentials": "include"
});

Using the above POST call, you can submit a new comment to the list item as the current user (there is no way to add list item comments on-behalf of another user). When you execute the request and update your x-requestdigest, and the appropriate values for the URI, your comment will be successfully added to the list item (see below).

I hope you find this post helpful and if you have any questions, please feel free to reach out!

SharePoint Online – Retrieve values of a multi-line text field with append changes in a single REST call

One of the most common questions I see in SharePoint support forums is how to retrieve the history of a multi-line text field with “append changes” in SharePoint. In most cases, the answer is to retrieve each previous version of a SharePoint item and iterate through them to construct all values in the multi-line text field.

The reasoning behind this is fairly obvious — each instance of a change in the multi-line text field is stored in a separate version of the SharePoint item.

Take for example the following Test list. This list contains a title field and a multi-line text field with “append changes”

If you open up the information panel for this item, you will see the multiline text field with the previous values. Notice how I have updated this item twice and added a value to the Multi field multiple times.

In order to see how SharePoint stores this data, check out the version history. The version history shows the two times I have edited the item, with the latest version being the most recent value in the multi-line text field.

Now you can see why you need to loop through versions. If you did a standard REST call using something like _api/web/lists/getbytitle(‘Test’)/items(1), the Multi column would only have the value of “My second comment in the multiline text field”.

Well, fear no more! There is in fact a way to retrieve the values in your list item without having to iterate over each previous version of the item.

Introducing RenderExtendedListFormData()

An unknown and undocumented REST endpoint exists in SharePoint Online called RenderExtendedListFormData() is the solution we need. You may be saying, “oh, we shouldn’t use undocumented REST endpoints”. Valid point, however, you should be aware that this endpoint is exactly what is used when rendering the information pane in Modern SharePoint via first-party.

Below you will see how to make this request into SharePoint. The RenderExtendedListFormData method is a POST call and takes 5 parameters:

itemId – The ID of your list item

formId – The form name (this is how MSFT determines what fields are returned in the request based on the form)

mode – I haven’t figured out what this means yet

options – I haven’t figured out what this means yet

cutoffVersion – Which is the latest version you want to pull. e.g, if you pass in 0, it will retrieve every version up until the first. If you pass in “2” it will put every version up until 2.0.

fetch("https://yourtenant.sharepoint.com/sites/contosoportal/_api/web/GetList(@v1)/RenderExtendedListFormData(itemId=1,formId='editform',mode='2',options=47,cutoffVersion=0)?@v1=%27%2Fsites%2Fcontosoportal%2FLists%2FTest%27", {
   "headers": {
     "accept": "application/json;odata=verbose",
     "accept-language": "en-US,en;q=0.9",
     "content-type": "application/json;odata=verbose",
     "sec-fetch-dest": "empty",
     "sec-fetch-mode": "cors",
     "sec-fetch-site": "same-origin",
     "x-requestdigest": "<yourRequestDigest>",
   },
   "referrer": "https://yourtenant.sharepoint.com/sites/contosoportal/Lists/Test/AllItems.aspx",
   "referrerPolicy": "strict-origin-when-cross-origin",
   "body": "",
   "method": "POST",
   "mode": "cors",
   "credentials": "include"
 });

The Response

The response from this call includes a lot of data as it’s used for the rendering of the edit form, but if you look closely you’ll notice the values for the multiline text field are stored in d.RenderExtendedListFormData.<ColumName>

The Multi (your column name) object contains all of the values in the multi-line text field based on the parameters of my REST call above. The response includes the text value, who wrote the value (email, title, id) as well as when the item was created.

HOW AWESOME IS THAT?! I retrieved all appended changes of my multi-line text field, using a single REST call.

Caveats + FYI

As mentioned previously, this is an undocumented REST endpoint. Even though this is used first-party by Microsoft, you should be aware this endpoint is subject to change and your solutions will have a dependency on that. Use at your own risk!

If you know what the other parameters (mode / option) mean in the REST call, I’d love to find out! Please message me if you know!

Retrieve Modern SharePoint list item comments using REST

Recently someone had posted on a SharePoint support forum asking whether or not it was possible to retrieve the new modern list item comments programmatically. In case you haven’t seen this yet, Microsoft has introduced the ability for users to add comments to the activity feed on list items in SharePoint.

To add a comment, navigate to your list item, open up the information pane and scroll to bottom. You will see the activity feed where you can add, remove and view comments from yourself and others on a list item.

While the endpoint is not yet documented, it is indeed possible to interact with these comments. However, be aware, the comments are not apart of the list item object in REST, you must call a different endpoint to retrieve the values.

Get list item comments using REST

To retrieve all of the comments on a list item using REST, you can make a GET call the following API endpoint.

/_api/web/lists/getbytitle('<ListName>')/items(<ItemID>)/GetComments()

Here is the response

{
    "d": {
        "results": [{
            "__metadata": {
                "id": "https://yourcompanyname.sharepoint.com/sites/SiteName/_api/web/lists('43f52951-64fa-4362-b03e-4fefde369da9')/GetItemById(1)/Comments(1)",
                "uri": "https://yourcompanyname.sharepoint.com/sites/SiteName/_api/web/lists('43f52951-64fa-4362-b03e-4fefde369da9')/GetItemById(1)/Comments(1)",
                "type": "Microsoft.SharePoint.Comments.comment"
            },
            "likedBy": {
                "__deferred": {
                    "uri": "https://yourcompanyname.sharepoint.com/sites/SiteName/_api/web/lists('43f52951-64fa-4362-b03e-4fefde369da9')/GetItemById(1)/Comments(1)/likedBy"
                }
            },
            "replies": {
                "results": []
            },
            "author": {
                "__metadata": {
                    "type": "SP.Shring.Principal"
                },
                "email": "beau@yourcompanyname.com",
                "expiration": null,
                "id": 6,
                "isActive": true,
                "isExternal": false,
                "jobTitle": null,
                "loginName": "i:0#.f|membership|beau@yourcompanyname.com",
                "name": "Beau Cameron",
                "principalType": 1,
                "userId": null,
                "userPrincipalName": null
            },
            "createdDate": "2020-12-15T21:32:05.52Z",
            "id": "1",
            "isLikedByUser": false,
            "isReply": false,
            "itemId": 1,
            "likeCount": 0,
            "listId": "43f52951-64fa-4362-b03e-4fefde369da9",
            "mentions": {
                "__metadata": {
                    "type": "Collection(Microsoft.SharePoint.Comments.Client.Identity)"
                },
                "results": []
            },
            "parentId": "0",
            "replyCount": 0,
            "text": "Add a new comment"
        }]
    }
}

Creating hyperlinks to missing pages in modern SharePoint

If you ever used the classic Wiki pages in SharePoint, there was a really cool feature that allowed users to link to pages that did not exist yet. In SharePoint Wikis, you could link to another page on your site using the double bracket syntax. Example:

Please go to the [[Announcements]] page.

SharePoint would handle this by connecting the the Announcements page to the text within the brackets. The really cool thing about this is if a user clicked on a link to a page that didn’t exist it yet, SharePoint would ask them to create a new page! This is similar to how Wikipedia creates empty hyperlinks to pages that still need to be created.

A question came up in a SharePoint sub-reddit asking whether this works in Modern SharePoint. The answer is YES!

Back to basics

To see this feature in action, create a new page in your SharePoint site and add a text webpart to the page.

Let’s say at the end of this text, we would like to add a link to an existing page within this site. All we have to do is start typing “[[” and SharePoint will return all the pages we can link to.


If we wanted to link to the Singapore trip report page, we could then just click that page from the dropdown, and it will become a direct link to that page. Pretty cool right!?

Creating a new page from a link

Now that we have seen how using the “[[” allows users to link to existing pages, lets see how Microsoft brought forward the classic Wiki linking functionality to allow users to create hyperlinks to pages that do not exist yet.

To do so, start by typing “[[“, but ignore the dropdown values for existing pages. Continue typing in the title for a new page and close it with two double brackets “]]”. Make sure you press space key or click away from the “]]” or else the resulting link will be a 404.

Once this happens, SharePoint will automatically create a hyperlink for us.

If you look closely at the link, you’ll notice that the URL points to a new page (doesn’t exist), and it passes along the ?wikiTitle=Communication query string.

The wikiTitle query string parameter notifies SharePoint to not throw a 404 error, but instead initiate the new modern page creation flow. When a user clicks on this link, SharePoint will popup the page template selection screen!

Once a user selects a template, they will be brought to the new Communication page to continue editing and finish creating the page.

This page has also now been linked correctly to our previous page!

Renewed as a Microsoft MVP for 2020-2021

It’s that time of the year… July 1st has arrived and the Microsoft MVP renewals have been completed! I am excited and honored to announce that I have been re-awarded Microsoft MVP for Office Apps and Services for a third time.

MVP

Once again, I’d like to thank Microsoft for continuing my involvement with the MVP program, and embracing the relationship between the platforms we use and the community that is heavily involved with it.

Recap: The Past year

The past year has been an awesome year for me, both personally and professionally. Each year I like to focus on new methods and ways in which I can interact with community — this past year was no exception.

Community Closeups

My good friend David Warner and myself wanted to start a new Podcast/Vodcast called Community Closeups. Community Closeups is a video series that highlights the unique and talented individuals in our community. It’s a laid back interview where we get personal and talk about what makes us unique — and of course, lots of SharePoint!

I would like to personally thank everyone who has been a guest on our show and sharing a little part of themselves with the rest of the community. As David always mentions, we know each other online through our photos and our avatars, but rarely do we get to learn  about the personal sides of the people we interact with daily. Thank you, from the bottom of our hearts for making this show a success!

Microsoft 365 PnP Team

This year I was/am honored to be invited as member of the Microsoft 365 PnP Team. The PnP Team is a collective of Microsoft Employees and community developers who work together to provide solutions, tools and guidance to the community through various open source initiatives. Over the last year I’ve had the pleasure of working on the PnP SharePoint Starter Kit and working in various GitHub Issues lists. It’s with great joy that I am able to help contribute to solutions and guidance that help developers adapt to the ever evolving landscape of Office 365.

Speaking Events

This past year was a really fun year for speaking. David Warner and myself teamed up and delivered a series of SPFx and PnP presentations across the US! We started in Salt Lake City, UT early in the spring and in fall we completed a “back-to-back-to-back”  weekend SharePoint Saturday tour starting in Los Angeles, followed by Boston and Denver! It was a great experience to share some of the tips and tricks for SharePoint Framework Development and meet all the extraordinary people in our community!

One of the coolest opportunities was being chosen to be a part of the Podcast center at Microsoft Ignite, where David and I hosted a Community Closeups episode with the great Vesa Juvonen!

Forums

One of the highlights for me every year is being a part of the rich community forums that we have. Whether you are a part of TechCommunity, Reddit SharePoint, Facebook SharePoint Groups, or any other forums, there is a limitless amount of knowledge sharing. The forums exist not only for asking for help and seeking guidance, but they are filled with community members sharing what they’ve learned, through blogs and videos and tutorials.

Looking Forward

2020 has started out to be a very interesting year. COVID-19 has introduced some difficulties in hosting in-person events, and as such, I likely won’t be speaking at too many conferences this year (unless virtual), but we are looking to try and host a SharePoint Saturday Event online at some point later this year or early next year!

This year I would like to take the opportunities to keep expanding Community Closeups and interviewing all the amazing people in our community (hopefully more interviews than last year!).  If you want to be on the show… reach out!!

Per usual, you’ll be able to find me in the forums. Whether it’s Reddit, SP-Dev-Docs or Facebook groups, if you need something, you know where to find me! 🙂

Thanks again!

SharePoint JSON Formatting – “Name cannot begin with the ‘=’ character”

Have you ever tried to apply column formatting to your SharePoint list views using code? If so, it’s likely you have come across this error and unfortunately there isn’t much information in the documentation on how the JSON Formatter string should be formatted.  Take for example this scenario:

Updating a view format using PnP PowerShell

PnP PowerShell has functionality for setting properties of a view using the command Set-PnPView

Updating the formatting on your list is done by passing in a JSON string to your Set-PnPView command using the CustomFormatter value property.

Set-PnPView -List "MyList" -Identity "MyViewName" -Values @{CustomFormatter = @'my-json-formatted-string'@}

Example JSON

Below is a basic example of applying a background color to a row on a view when the DueDate is less than now (date time).

{"schema":"https://developer.microsoft.com/json-schemas/sp/view-formatting.schema.json","additionalRowClass": "=if([$DueDate] <= @now, 'sp-field-severity--severeWarning', '')"}

Applying this format using PnP PowerShell

To apply this JSON script, you would use the following command

Set-PnPView -List "MyList" -Identity "MyViewName" -Values @{CustomFormatter = @'
{"schema":"https://developer.microsoft.com/json-schemas/sp/view-formatting.schema.json","additionalRowClass": "=if([$DueDate] <= @now, 'sp-field-severity--severeWarning', '')"}
'@
}

Running this command, you will likely receive the following error: Set-PnPView : Name cannot begin with the ‘=’ character, hexadecimal value 0x3D.

The Fix:

The reason you are seeing this error is because in the JSON itself you need to encode some of the values if you are using operators. What I mean by that is, if you are using &&, or operators in formulas such as “>=” or “<=“, you need to use their encoded values instead. In our example, we were using [$DueDate] <= @now. In order to apply this to our view, we need to encode “<=” into  “&lt;=” and the formula will work.

Below is the following command with a working JSON formatter value.

Set-PnPView -List "MyList" -Identity "MyViewName" -Values @{CustomFormatter = @'
{"schema":"https://developer.microsoft.com/json-schemas/sp/view-formatting.schema.json","additionalRowClass": "=if([$DueDate] &lt;= @now, 'sp-field-severity--severeWarning', '')"}
'@
}


Hope this helps you!

Diagnosing changes with the Modern SharePoint page version history.

If you love SharePoint, then you already know about it’s rich document and information management capabilities. Version history is a feature of SharePoint that is extremely powerful if you need to look back in history at the changes of an item. This works great if you are working with list items only, as you can see how the fields have changed on a specific item overtime. For documents and pages, SharePoint version history is unable to show us exactly what has changed within those pages.

Turns out, in modern SharePoint we do have better version history which shows us what changes have been done to modern site pages! This is an extremely powerful tool to keep track of changes of your modern SharePoint site pages over time. 

Viewing Version History

In order to view the version history of your modern SharePoint site pages, navigate to the page in question. In my scenario, we’ll be looking at a Communication site home page which has a series of hero, news and events web parts on it.Homepage

Accessing the version history is easy. On the page in question, select the “Published” button next to the “Edit” button in the top right of the page. The page will re-render and load a slide out panel from the right hand side, showing the version history of the page.

HomeVersion

Notice how you can see a history of changes that were completed on the page. In my example, edits were made to News, Spacer, Text, Quicklinks, and Events between version v3.0 and v2.0. If I would like to dive into this a bit more, I can select “Highlight changes on the page” toggle from the top of the panel. When turning this one, new boxes will highlight around the web parts that were changed with a specific color.

HomeVersion2

Green means added, Yellow means edited and Red means deleted.
How awesome is that!? Do you think this is valuable? Any new features you’d love to see come to version history?