Edit HTML files in SharePoint Library

In Modern Office 365, one of the neat new features is the ability to edit HTML files by opening up a file from a Modern library. The HTML contents would load in the browser and were able to edit the HTML without having to download the file or edit the file using SharePoint Designer — this was a very powerful capability for many people.

Well, recently Microsoft has removed this capability (not sure why) as noted by Mark Rackley. Please vote in the UserVoice!

 What to do?

This wasn’t the first occurrence of this issue. I have found others posted about this topic on other social forums such as Reddit and Facebook. Because of this, I have decided to just build a simple little CommandSet button that will run on SharePoint libraries, which bypasses the new Microsoft changes and allows you to edit an HTML file in the browser. In order to do this, all we need to do is append &p=5 into the browser URL.

The Solution

The solution was quite simple. Build a SPFx CommandSet button, which allows the user to select an HTML file and then navigate to the view page with &p=5 appended to it.


COmmandSet

The code is quite simple. When a user selects a file with a file type of “html”, show the command button. When the button is clicked, grab the FileName, file path and folder path. Construct a new URL, and append &p=5.

What it looks like

Select an HTML file, the CommandSet button shows up

Library


Click “Edit HTML”, the page will redirect to the modern list view display form, with &p=5 to load the default edit view of the file.

TestFile

Try it out

If you’d like to try it out, please do. I have uploaded the source and the sppkg file to my GitHub Repository.  The sppkg file will be in the sppkg folder. Upload this to your app catalog. Subsequently, you can deploy the app via Site Contents or using PowerShell.  Below is a sample PowerShell command for you. (This is old code, there are other ways to provision this)

 Connect-PnPOnline -Url https://test.sharepoint.com/sites/MySite
 
 $context = Get-PnPContext
 $web = Get-PnPWeb
 $context.Load($web)
 Execute-PnPQuery
 
 $ca = $web.UserCustomActions.Add()
 $ca.RegistrationType = "List"
 $ca.RegistrationId = "101"
 $ca.ClientSideComponentId = "6599b3cc-7631-4a55-962e-43d1757977ec"
 $ca.ClientSideComponentProperties = "{""sampleTextOne"":""Edit HTML""}" 
 $ca.Location = "ClientSideExtension.ListViewCommandSet.CommandBar"
 
 $ca.Name = "EditHTML CommandButton"
 $ca.Title = "EditHTML CommandButton"
 $ca.Description = "EditHTML CommandButton"
 
 $ca.Update()
 
 $context.Load($web.UserCustomActions)
 Execute-PnPQuery


PnP-Starter-Kit for Standard Release Tenants

I am going to preface this blog post with — if you have an issue with the solution setup I have below, please do not add issues to the PnP-Starter-Kit issues list. This solution below, is a replication of the pnp-starter-kit and not managed by the PnP Team.

I’d also like to say, that you don’t need this post. The PnP-Starter-Kit should be deployed into First-Release tenants. I’ve had reservations on whether or not to post this.

What is it?

The PnP-Starter-Kit is an open sourced initiative that was released by the PnP-Team to show all of the capabilities that currently exist around provisioning in Office 365 using the SharePoint Framework and PnP Provisioning. For more information on the project, the GitHub repository can be found here.

One of the requirements of the PnP-Starter-Kit, is that it requires your tenant to be configured for “First Release for everyone”. This is because some of the web parts utilize the new AadHttpClient and MsGraphClient. These are currently in preview, but require permissions to be requested and approved under “API Management” in the admin center.

What’s in this my solution?

This solution is essentially an exact replica of the PnP repository, except that I have removed all of the web parts that require First Release and I have modified the deploy scripts and PnP Provisioning XML files to also support standard release tenants. What this means is that you will not have the LOB application or any of the web parts that generally show up on the personal page (except the people directory).

Why do this?

You may be wondering why I would do this. Since all of this is brand new and uses experimental features, it should only be deployed into a test/demo tenant, where turning on First Release shouldn’t be a problem. However, through some of the issues lists and comments I’ve seen on social media, it appears many people want to deploy the web parts into standard release tenants to test out the web parts, so I figured “why not?”.

You can get a demo tenant for free and set that tenant to first-release. However, if you really feel you want to deploy this into Standard Release… here you go.

How to deploy

The deployment of this is exactly the same as the full PnP Starter Kit, except you don’t have to configure any of the API management stuff.

GitHub Repository Here

  1. Make sure you’ve updated your PowerShell module to the latest version.
  2. Make sure your development environment is configured correctly here.
  3. Make sure your tenant is configured following this page for the User Profile property for the Portal Footer.
  4. Make sure your tenant has an app catalog
    1. Wait 24 hours after creating one
  5. Make sure your account is a Term Store Administrator

To deploy the starter kit, you’ll need to upload the sharepoint-portal-showcase.sppkg from the /package folder to your app catalog.  This will provision the web parts to all of your site collections for use. If you’d like to also include the 3 demo sites, and pre-built pages included in the full starter kit, then open up Powershell and navigate to the provisioning folder. Once inside the folder, execute the following command to start the provisioning process.

.\deploy.ps1 -TenantUrl https://YourTenant.sharepoint.com -SitePrefix Demo


Questions?

If you have any questions, just ask me. Please note, that I will not really be maintaining this repository, so it will not be receiving any of the new bug fixes and updates from the PnP Team.

Please do not add issues about this package to the PnP-Starter-Kit GitHub repository issues list.

PnP-SP-Starter-Kit Hints and Tips

If you are like me, you followed all of the updates at SharePoint Conference North America 2018 and you heard about an awesome new starter pack created by the PnP Team, and you couldn’t wait to install it and deploy it into your environment.  You can find the Starter Kit here.

Please note, this blog post isn’t official documentation,  nor am I a part of the PnP team… but these are just some issues I have seen as I’ve started exploring.

Before going any further

Before you follow the rest of this blog, please note that the PnP team has updated some of the deployment documentation. I highly recommend running through this documentation to make sure your environment is prepared for the PnP Starter Kit.

Documentation found here and tenant settings here.

Foreword

What is important to know is that this solution is an all encompassing solution. It provides you with web parts, customizers, site designs, MSGraphClient configuration, a hub site, lists, content types, a sample LOB application and more. This might be the most exhaustive example of modern SharePoint provisioning I have seen. There really is an impressive amount of work that was put into this! Kudos to the team and community for putting this together.

A few Hints

Downloading the Project

Downloading the project is quite simple, assuming you’ve developed SPFx before. If you haven’t, you may want to spend some time setting up your development environment.

To download the project, navigate to the starter kit from the link above. You can clone this repository to your local machine using the Github UI.

PnpStarterKit

Or, you can use the following git commands

git clone https://github.com/SharePoint/sp-starter-kit/


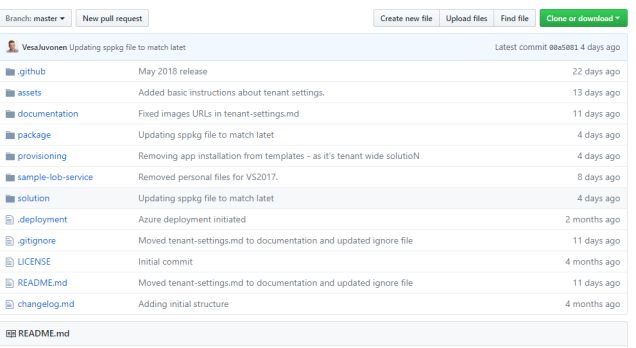
If you’d like to know how the starter kit gets provisioned, you’d want to look into the provisioning folder. You’ll find a collection of PowerShell scripts which will help you deploy the starter-kit. Before you go any further, please read the documentation on GitHub and make sure you have configured your environment and followed the deployment procedures.

Update your PnPPowerShell module

You’ll want to update your PnPPowerShell module to the latest version. In order to do this, open up Powershell and execute the following command.

Update-Module SharePointPnPPowerShell*

Deploy the starter kit

  1. Make sure you’ve updated your PowerShell module above.
  2. Make sure your development environment is configured correctly here.
  3. Make sure your tenant is configured following this page.
  4. Make sure your tenant is “targeted release for everyone”.
    1. Wait 24 hours after enabling this
  5. Make sure your tenant has an app catalog
    1. Wait 24 hours after creating one
  6. Make sure you are a term store administrator.

To deploy the starter kit, you’ll need to upload the sharepoint-portal-showcase.sppkg from the /package folder to your app catalog. To learn how to upload files to your app catalog, follow this link.

Then open up Powershell and navigate to your provisioning folder. Once inside the folder, execute the following command to start the provisioning process.

.\deploy.ps1 -TenantUrl https://YourTenant.sharepoint.com -SitePrefix Demo

The SitePrefix parameter is for the prefix of the newly created site collections.

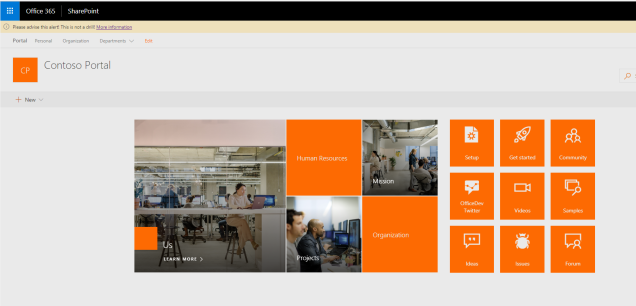
When you execute this command, you’ll notice a ton of actions happen. The solution is going to create a couple demo sites for you. “Demo_Portal”, “Demo_hr”, “Demo_Marketing”. The script is going to create the Demo_Portal site as a hub site, and connect the other two sites to it.

The script will install the app package you previously uploaded in the app catalog into the sites that are being created. It will then create two site designs for Team sites and for a Communication site, and then create new navigation elements for your hub sites.

The deployment script will also create a handful of pages for your Portal site and automatically provision the web parts to the page. This is just the start… the deployment script actually provisions and exhaustive set of functionality, however this post isn’t about all of the functionality. 🙂 Have a look yourself and see what it provisions!

Deployment Failed

When upload the .sppkg file to the AppCatalog, you may receive an error stating “Deployment failed”. Just delete the .sppkg file and re-upload the package to the app catalog!

Error in application

When uploading the .sppkg file into the App Catalog, you may receive this error. If you had just recently created your App Catalog, you may need to wait up to 24 hours for the change to fully propagate successfully. So wait 24 hours and try to upload the .sppkg file again!

Apply-PnPProvisioningTemplate Error #1

Apply-PnPProvisioningTemplate : Object reference not set to an instance of an object. At C:\Users\beaucameron\spfx\sp-starter-kit\provisioning\deploy.ps1:96 char:5

This will likely be the first error you see when trying to deploy the solution. Make sure the .sppkg file is already in the app catalog. If you haven’t manually deployed it, please do so now by following in the instructions at the top of this blog. If you haven’t created an App Catalog in your tenant, you will also need to do this.

If you just recently created the App Catalog, you may have to wait up to 24 hours for it to be completely functional.

App Package Not Valid

Apparently some people have been unable to deploy the solution to the app catalog and receive an error that the app package is not valid. Garry Trinder mentioned this issue, and so far others have confirmed that it is because API Management configuration is missing from your admin center. If this error happens for you and you are also missing API Management from the new Admin Center could you let me know (confirmation)?

In order to add API Management to your admin center, you must enable “Targeted Release” for your tenant, instead of specific users. It may not be immediate and may take a few hours for the changes to propagate to your tenant. When doing this, you should do it on a non-production tenant.

New-PnPSite Error

If you are receiving  the following error:

New-PnPSite : {"d":{"Create":{"__metadata":{"type":"SP.Publishing.CommunicationSiteCreationResponse"},"SiteStatus":3,"SiteUrl":""}}}

Could you confirm if you have had previously deployed the starter-kit and then subsequently deleted the site collections and re-deployed? If so, could you let me know. It appears that there may be an issue with the New-PnPSite command when executing against a deleted communication site.

I have repro’d this error by running the deploy.ps1 using no -SitePrefix parameter. I then deleted the sites that were created, and re-ran the deploy.ps1. Even the though the sites do not exist, the New-PnPSite command cannot create a new site.

Try re-executing the command but modifying it by adding a new SitePrefix.
 .\deploy.ps1 -TenantUrl https://YourTenant.sharepoint.com -SitePrefix NewSitePrefix

If you’d like to re-use an existing SitePrefix, you can a couple PowerShell commands to clean up the deleted sites. Per @Andreas (thanks!)

//permanently delete all deleted sites
Connect-SPOService -Url “SharePoint Admin Tenant Url”
Get-SPODeletedSite | foreach { Remove-SPODeletedSite -Identity $_.Url }

//Remove hubsite associations
Get-SPOHubSite | ? {$_.Title -eq “PnP SP Starter Kit”} | Unregister-SPOHubSite

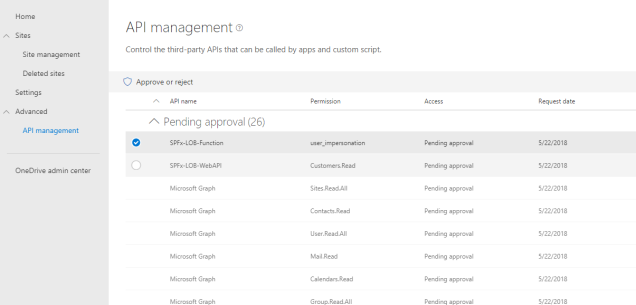
A service principal with the name SPFx-LOB-Function could not be found / a service principal with the name SPFx-LOB-WebAPI could not be found.

Inside API management in the admin center, you may find that when you are trying to approve the API permissions you receive this error on the LOB-Service application. I believe the reason is because the LOB service API doesn’t get provisioned with the deploy.ps1 script. So these service principals aren’t a part of your tenant’s AAD.

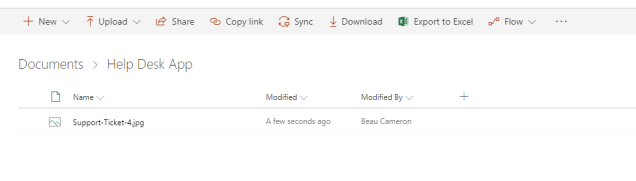
If you look inside your repo/folder structure, you’ll see a folder named sample-lob-service, which holds a Visual Studio solution for a sample WebAPI project. This solution needs to be deployed to your Azure environment, and two service principals have to be created with two permissions scopes:

  • a default “user_impersonation” scope
  • a custom “Customers.Read” scope

The service principals needs to be created and given permission to your sample-lob-service API.

Long story short – You need to register a resource in Azure for this WebAPI, subsequently deploy it and configure the service principals. There isn’t any documentation yet about setting this up. As this is a new starter-kit… documentation is still being created by the PnP Team. I suspect more information on how to setup/configure/deploy this will be coming in the future.

My navigation isn’t showing up

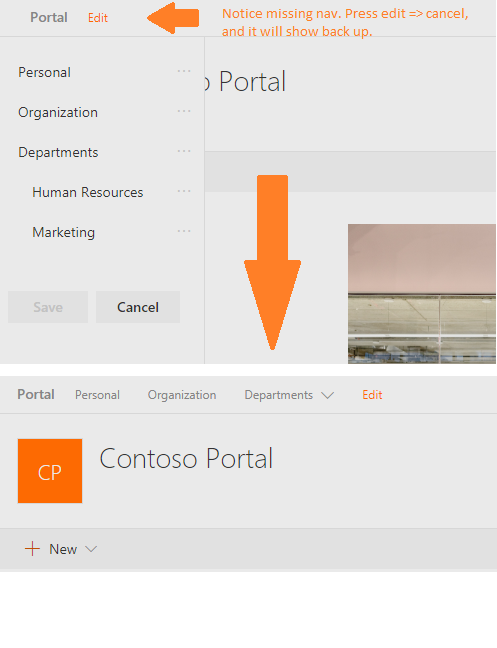
One of things you may notice after deploying the starter kit, is that the hub navigation doesn’t work. In general, hub navigation is a bit finicky but a simple way to make the navigation show up is by editing the navigation and cancelling out… or just wait for it to fix itself (caching).

navigation.png

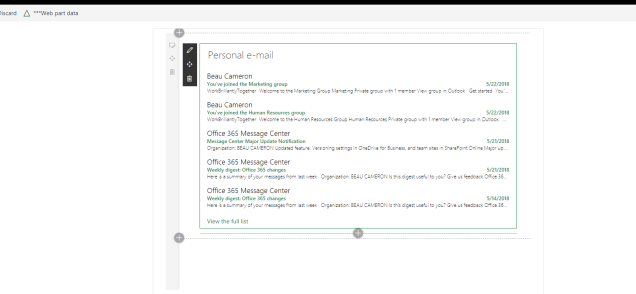
Personal Web Parts aren’t loading

If you navigate to the personal page in the navigation, it brings you to a really awesome page with a bunch of SPFx web parts on it that utilize Microsoft Graph. These web parts include:

  • Upcoming Meetings,
  • My Tasks
  • Personal Contacts
  • Personal Email
  • Recent Documents
  • Recent Sites

You may find the personal web parts aren’t loading correctly, here are some possible reasons.


Access is denied. Check credentials and try again.

accessdenied.png

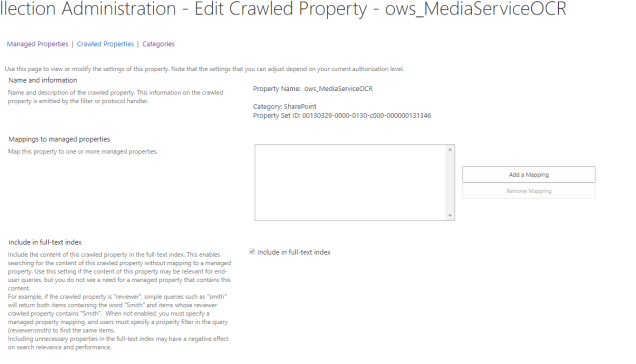
You may find that your personal web parts, aren’t loading at all and showing you that your credentials are invalid. This is because (at least in my environment), you need to explicitly give permission to the SPFx web parts to have access to the Microsoft Graph. If you navigate to the new admin center, https://yoursite-admin.sharepoint.com/_layouts/15/online/AdminHome.aspx on the left hand side, select API Management under Advanced. You’ll see a list of pending approvals for the new applications. Approve this request and your web parts will start working!

APIManagement.png


User login is required

If you’ve configured the permissions in API management, you may find that the web parts still aren’t loading.

User login is required

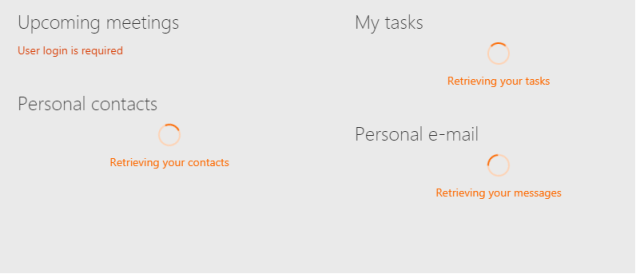
It appears there is a bug (race condition?) that has effected acquiring a token for the AadHttpClient/MSGraphClient. Creating a new page and/or workbench, may allow you to see the web part temporarily. However, the bug/issue still exists and is linked below.

Emails.png

I found there is a support ticket on this issue which can be found on GitHub, issue 1810.

I have no Alerts

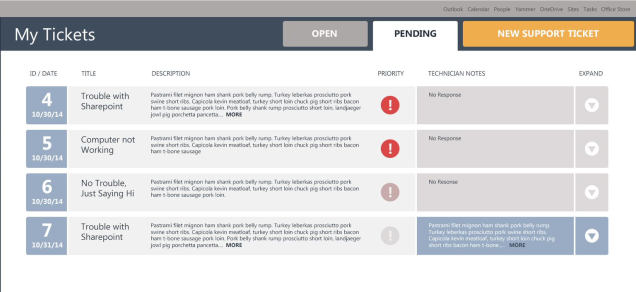
One of the cool application customizers deployed with this starter pack is a top header that shows configurable alerts. This is one of the only lists that doesn’t pre-populate with data through the deployment process. If you’d like to test it out, navigate to site contents and add some alerts to the Alerts list!

Alerts

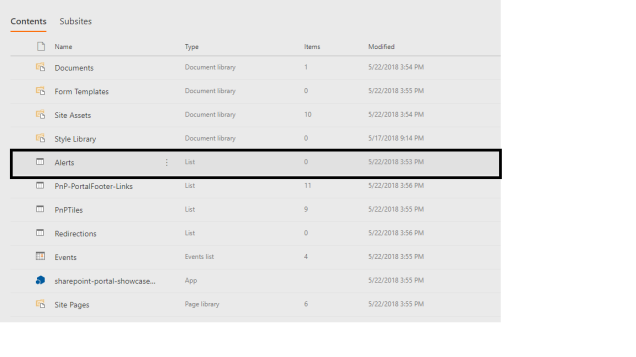
Once you have, you should be able to refresh your page see the alerts show up on your modern pages!

AlertDialog


More…

If you’d like to know more of the features that are included in the starter kit, Robert Shouten has made a great post outlining the web parts and functionality here.

Disclaimer

Once again, I’d like to re-iterate that this isn’t any official documentation and that more documentation is linked at the top of this post.

Thanks to the PnP team and Vesa for all their continued effort. Sharing is caring.

My favorite updates from SharePoint Conference 2018 Keynote

It’s finally here! SharePoint Conference 2018 kicked off today with a load of new features that we all should be excited to hear about! In this post we’ll do a quick run down from the  Keynote at the SharePoint Conference.

This isn’t a complete list of updates, frankly there are too many! However, here is a list of my favorites so far.

OneDrive

Mobile Devices
  • The ability to scan in documents, receipts from your mobile device and immediately upload the document to OneDrive.
  • Back up your camera roll from your mobile device directly to your personal OneDrive and your business OneDrive!

Search

As previously shown at Ignite 2017, new search features are powered by AI and Machine Learning. What this means is that SharePoint, Office 365 and Microsoft 365 will now provide a personalized search based on commonly visited content, content relevant to you and more.

SharePoint Team Sites

Document Libraries
  • Real time changes to libraries and lists! When colleagues change data in the lists, it will instantly change for you without refreshing the page!
Document Library Web Parts
  • Web Parts will now support Drag & Drop, Filtering, Sorting and grouping functionality.
  • Column Formatting JSON
    • Users can now bring in rich KPIs they built on a document library and use those features in a page through the document library web part.

SharePoint Lists

SharePoint lists are getting revamped in an effort to make lists easier for your users. This includes a modern UI for building lists based on existing lists in your site.

  • Provide the ability to create a list  and automatically bring over Flows and PowerApps into your new list based on the previous list.
    • Lists
  • Real time updates
    • You will be able to see updates immediately as other team members are updating and modifying the list.
    • You will not need to use refresh to see the latest list updates
  • Paste from Excel
    • You will be able to take an excel table and paste it into a SharePoint list.
    • Lists will create columns for you if they are missing from the SharePoint list.
  • PowerBI
    • PowerBI will be able to be integrated with your SharePoint lists using machine learning and AI to built real time analysis of the data in your lists!

SharePoint Communication Sites

SharePoint Pages
  • Tag pages with metadata
    • Ability to tag pages with metadata such as Region, Role, Activity. These values are just columns on the SharePoint library which allow you to create web parts to filter pages within your organization.
  • Page Approval workflow
    • A new page approval workflow is powered by Microsoft Flow
    • Can be customized to meet your approval needs!
    • Can be approved via from the approval panel in SharePoint or from within an actionable email.
Microsoft Stream
  • Microsoft stream now transcribes the video for easier searchability of your videos.
SharePoint News
  • Publish news from SharePoint to Microsoft Teams, to the SharePoint mobile app or directly to email!
  • News Scheduling & publishing
    • The ability to not only publish News via a scheduled date
New Web Parts
  • Weather Web Part (giggle)
  • Microsoft Training Services
    • Delivers content directly to your intranet. Content is delivered from Azure and provides all the training users may be interested in to be showed on your SharePoint Pages.
  • Hinted at more…

Hub Sites

Site Scripts
  • The ability to run site scripts when adding new sites to a hub. This will allow you to run custom logic such as creating new lists or even managing permissions immediately as a site joins a hub site.

SharePoint Development

SharePoint Development using SharePoint Framework will now be cross platform. That is, web parts you built in SharePoint using the SharePoint Framework (SPFx) will now be able to be used in Microsoft Teams

Microsoft Teams

  • New Tab Features
    • Will support the new document library web part as well. So when users are inside Microsoft teams, they can now drag and drop, filter and use column formatting directly within Microsoft Teams.
    • Will also support SharePoint pages within your Microsoft Teams tabs. This will make it much easier for users to stay organized and focus on work, without ever having to leave Microsoft Teams.
    • Will support SPFx web parts as new tabs.

Microsoft Flow

  • SharePoint Integration for managing Business Critical Data
    • When adding content & images to a SharePoint library, Microsoft flow can be used to run Text Analysis to figure out important metadata and information that is relevant to the document. This information could be location a photo was taken, common words found in the document or library and automatically tag your content!

SharePoint On-premises

  • Modern UI will be coming to SharePoint 2019
    • SharePoint Home
    • Modern Team and Communication Sites
    • Modern Lists and Libraries
    • New Modern authoring canvas for SharePoint pages.

Looking for more updates on SharePoint 2019? Check out my good friend Nick Brattoli’s post on all the super awesome features coming to on-premises! https://collab365.community/sharepoint-2019-features-announced/


OCR Support in Office 365

Last year at Ignite, Microsoft announced OCR capability using “computer vision technology” would be coming to Office 365! This stirred up a lot of excitement as this was a feature many people have been wanting for years! Microsoft posted an article at techcommunity about the new advancement in Intelligent Search using OCR which can be found here. Well I am happy to say it exists and it sure is awesome!

Supported Types

Per the techcommunity article above, the supported types are “bmp”, “png”, “jpeg”, “jpg”, “gif”, “tif”, “tiff”, “raw”, and also “arw”, “cr2”, “crw”, “erf”, “mef”, “mrw”, “nef”, “nrw”, “orf”, “pef”, “rw2”, “rw1”, “sr2”.

To test this capability, I have uploaded a mock up design for a Help Desk Add-In I have built for Office 365 into a Document library.

SupportTicket

The jpg looks like this

HelpDesk

You’ll notice inside the image there are 4 tickets have been mocked up with a bit of bacon ipsum. The ticket titles are “Trouble with SharePoint”, “Computer not Working”, “No Trouble Just Saying Hi” and “Trouble with SharePoint” again.  My plan to test out OCR is to search for the contents of that Title using SharePoint search!

Test: Search for Ticket values

My first test will be trying to find one of the tickets labeled “Trouble with SharePoint” and look at the results! Not only does it match with the values in the image, but it’s also picking up the other ticket values as well.


SearchResult

It should be no surprise that when I search for some of the description of the tickets, that they should return in search results as well. I’ve decided to search for the first sentence of the description in the mock up. Here is the result!

SearchResult2Does it work in Modern too?

In my previous examples I was using SharePoint Classic Search. If you were wondering if it works in Modern search as well, you bet!

modernsearchHow does it work?

My guess is that OCR in SharePoint is using Azure Media Services to convert text content in digital files into digital text. The reason for assuming this is because of the following naming convention used in SharePoint.

Whenever SharePoint finds text within your images, the values get stored on the item in a field called MediaServiceOCR. Take a look at the JSON response from querying for the list item.

MediaServiceOCR

I wasn’t able to find a default managed property for this field but that isn’t a huge problem because SharePoint automatically creates a crawled property called ows_MediaServiceOCR. Using this crawled property, I can create whatever managed property mappings that I want.

Crawled.png


Some Comments

OCR PDFs have native support in Office 365. However, scanned documents which are PDFs currently aren’t generating values in the MediaServiceOCR column. I’ve been testing this functionality with no success — yet.

I have noticed some inconsistencies with the OCR functionality. I have tested this on multiple libraries and I have noticed it hasn’t been creating the MediaServiceOCR values on some items (doesn’t exist). I’ll keep you posted when I find more information about this.


Security Trimmed Hub Site Navigation Updates!

I had recently posted a blog  about a SharePoint Framework (SPFx) application customizer I built for use with hub sites in Office 365. The problem I currently have with Hub navigation is that all of the links are static links. This means, that whoever creates the common navigation must be cognizant of what links end users have access to. With that in mind, I built a new navigation the replaces the out-of-the-box hub site navigation elements with a security trimmed listing of sites within a Hub.

For brevity, this isn’t an all inclusive tutorial. It’s just discussing the high level changes to the original implementation of the application customizer.

How it works

The new navigation uses a combination of the SharePoint Search API and the new Hub sites API. When a user lands on a site collection that belongs with in a hub, I grab the hub site information to find all of the sites that exist within the hub using the Search API. The benefit of this, is that I can security trim a listing of sites with in the navigation. That means I can have sites in a hub that a user may not have access to, yet include them as elements in the global hub site navigation.

HubNavSite

What’s wrong with V1?

While this approach is great and I have had quite a bit of success building out security trimmed navigation, the default implementation lacks the ability to use the existing hub site navigation elements. This is why I have released v2 which is available on GitHub for download.

The new application customizer still implements the “Sites” listing node in the navigation.
NewNav

Adding existing Hub navigation

Version 2 is almost identical to version 1 with the exception that I am now pulling in the static elements from the default hub navigation. To do this, I’ve made some modifications to the base ReactHubsiteNavbarApplicationCustomizer.ts file, to set the Navigation property equal to the navigation array that returns from the _api/web/hubsitedata endpoint.

this._currentHubSiteData = await  searchService.getHubSiteData().then((hubData: IAssociatedSite) => {
if(hubData){
return searchService.getHubID(hubData).then((hub: IHubSiteData) => {
//add existing hub navigation
hub.Navigation = hubData.navigation;
return hub;
});
}
else{
return null;
}
});

Now that I have the elements as part of the _currentHubSiteData object, I just have to modify my HubNavBar.tsx component to accommodate loading the existing navigation nodes. One thing that isn’t working currently with the commandbar, is the ability to have a navigation element with children, in which the parent link is clickable.

SiteTrimmedMenuCode

You may notice the methods are almost identical. Rather than refactoring… I’ve separated them out because I have some future changes I’d like to make specifically to the rendering of the trimmed sites listing.

Ability to edit navigation

Now that we are showing the existing navigation elements and hiding the existing Hub navigation html…I needed a way to allow users to add and edit the original Hub navigation. There is an endpoint at _api/Navigation/SaveMenuState for saving changes to the menu, however it is undocumented by Microsoft so I will avoid using it for now. Instead, I am going to re-use the out-of-the-box Hub site navigation control to manage adding/editing elements.

To do this, I am checking if the user has ManageWeb permission, and then I will show an edit button which will show/hide the original Hub navigation.
//if user has manage web permissions, show edit button
const hasPermission:boolean = this.props.context.pageContext.web.permissions.hasPermission(SPPermission.manageWeb);


if(hasPermission){
commandBarItems.push({
key:"editButton",
name:"Edit",
itemType:ContextualMenuItemType.Header,
onClick:this._editOnClick,
className:"editButton",
href:"#"
});
}

Caveat: The out of the box permission for managing Hub navigation is the new “Edit” permission. Which means that users in the Member group have access to change the navigation. I think this is a bit too much permission, so I am restricting the permissions to “ManageWeb”.

The Result

hubnavnew

The end result is a combination of security trimmed sites listing within the hub and the existing hub site navigation. User’s with ManageWeb permissions on the Hub site will be able to see the edit button to modify the existing navigation elements.

Notes

Because of the caching in the customizer, it may take 15 minutes for changes to appear!

GitHub – https://github.com/bcameron1231/SharePoint-Framework/releases/tag/v2.0

Code is in pre-release and subject to change (refactoring).


Office 365 Hub sites Dos & Don’ts

Hub sites are out in targeted release and the masses are quickly jumping to PowerShell and creating hubs in their environments! While this is exciting news, there are many considerations you should be aware of when using Hub sites (hub sites are in preview and subject to change).  The DOs & Don’ts below are my opinion on how to use Hub sites.

Hub site basics:

  1. Hub sites roll up News, share a common theme and share common navigation
  2. Hub sites can be Modern or Classic Sites
  3. Hub sites can be Site Collections or Sub Sites
  4. Hub sites work with modern pages only
  5. Hub sites can be created via PowerShell & via REST


DOs

  • Plan before you create
    • Your tenant is limited to 50 hubs max (at this time). Be cognizant of this when planning any new Information Architecture around Hub sites.
    • Be aware Hub site functionality is best with modern pages, be aware of the current limitations when linking classic site collections. Classic pages will not share the navigation elements.
  • Create Hub sites out of Modern Communication sites & Office 365 Group sites
    • Modern sites will always give a consistent look and feel to your hub sites, because all of the pages are modern and will adhere to the navigation elements and theme defined in your hub
  • Use Hub sites as a way to connect team sites
    • Hub sites are a great way to roll up content from similar/connected teams. Use hub sites to share news!
  • Connect classic site collections into your hub
    • Hub sites support classic site collections. See “Plan before you create”.
    • Any sub sites within the associated site collection, which use modern pages will receive the common navigation and theme.
    • Modern theming is currently being released to classic sites (yay!)


DONTs

  • Do not individually link sub sites to Hub sites
    • This will become a maintenance nightmare. The reason being, sub sites can actually join a hub even when the parent site collection isn’t a part of the hub at all.
    • Navigation in the classic sense will become convoluted and lacks governance when switching between classic and modern, creating a poor end-user experience.
  • Add Navigation without being aware of the end-users
    • Hub site navigation is static navigation. Be aware that some end-users may or may not have access to the link you have provided.
    • With some customization, you can create security trimmed navigation. Follow my previous blog for more info.


I’m sure there are plenty more DOs and DON’Ts that I can add to this list. If you have any you’d love to add, comment and let me know!