Get site script from list using REST

New updates from Microsoft for site scripts and site designs really improved the creation of the JSON required in a site script. One of the newest features is the ability to generate a site script from an existing list. If you have seen my previous post on creating managed metadata fields using site scripts, you’d quickly learn how tedious and complex JSON can be.

Thankfully, there is a new process that allows you to generate the site script syntax from an existing list in your SharePoint environment, making it much easier to construct these site scripts. The current documented method for doing this is by using a PowerShell command called Get-SPOSiteScriptFromList.

There is another method for achieving this and it’s by using the REST api. Currently, this endpoint is not documented,  but I have submitted a PR in the documentation to correct this.

GetSiteScriptFromList

GetSiteScriptFromList is a new endpoint that allows you to generate the syntax required for a site script from an already created list.

Request

ParametersPass in a listUrl parameter with the url to the list you want to create the site script syntax for.

fetch("https://testsite.sharepoint.com/sites/test/_api/Microsoft.Sharepoint.Utilities.WebTemplateExtensions.SiteScriptUtility.GetSiteScriptFromList", {
    "credentials": "include",
    "headers": {
        "accept": "application/json;odata=verbose",
        "accept-language": "en-US,en;q=0.9",
        "content-type": "application/json;odata=verbose",
        "x-requestdigest": "YourRequestDigest"
    },
    "referrer": "https://testsite.sharepoint.com/sites/test",
    "referrerPolicy": "no-referrer-when-downgrade",
    "body": "{\"listUrl\":\"https://testsite.sharepoint.com/sites/test/Lists/Contoso%20customer%20list\"}",
    "method": "POST",
    "mode": "cors"
});

Response

The response contains an array of actions for creating this list.  The command supports most field types, including complex field types such as managed metadata columns.

{"d":{"GetSiteScriptFromList":"{
  "actions": [
    {
      "verb": "createSPList",
      "listName": "Contoso customer list",
      "templateType": 100,
      "subactions": [
        {
          "verb": "addSPView",
          "name": "All Items",
          "viewFields": [
            "LinkTitle"
          ],
          "query": "",
          "rowLimit": 30,
          "isPaged": true,
          "makeDefault": true
        }
      ]
    },
    {
      "verb": "addNavLink",
      "url": "Lists/Contoso customer list/AllItems.aspx",
      "displayName": "Contoso customer list",
      "isWebRelative": true
    }
  ]
}"}}

Now what?

Now that we have the syntax to create the list, we can just add the values from the actions array to a new or existing site script. For information on how to create a site script, follow the documentation here.


Invoking a Site Design Task using REST

Site designs provide the ability for the provisioning of assets during the site creation process in Modern SharePoint. The site design documentation is fairly robust and includes commands to interact with site designs using PowerShell and REST. Recently, there have been updates to Site Designs and the documentation is still playing catch up.

One of the latest releases includes the ability to invoke more than 30 actions in a site script. I’ve talked about this extensively in my previous post. This post includes the methods for executing a site design using PowerShell. Today, we’ll talk about the options of using REST.

ApplySiteDesign (old way!)

ApplySiteDesign was the original REST endpoint for applying a site design to an existing site collection. This would allow you create a POST request to the ApplySiteDesign endpoint and pass in the SiteDesignId and the WebUrl to the body.

This invocation is limited to the 30 actions in a site script.

Request

fetch("https://testsite.sharepoint.com/sites/test/_api/Microsoft.Sharepoint.Utilities.WebTemplateExtensions.SiteScriptUtility.ApplySiteDesign", {
    "credentials": "include",
    "headers": {
        "accept": "application/json;odata=verbose",
        "accept-language": "en-US,en;q=0.9",
        "content-type": "application/json;odata=verbose",
        "x-requestdigest": "YourXRequestDigest"
    },
    "referrer": "https://testsite.sharepoint.com/sites/test",
    "referrerPolicy": "no-referrer-when-downgrade",
    "body": "{\"siteDesignId\":\"38ef12db-e8b8-4716-96d9-7556c61bf98b\",\"webUrl\":\"https://testsite.sharepoint.com/sites/test\"}",
    "method": "POST",
    "mode": "cors"
});

AddSiteDesignTaskToCurrentWeb  (new way!)

AddSiteDesignTaskToCurrentWeb is the new REST endpoint for site designs, which provides the ability to overcome the 30 action limit. This new endpoint now allows for 300 actions or 100k characters in a site script (or cumulative across all site scripts in a given Site Design). The only parameters required to execute a site design task is to pass in the site design using the siteDesignId property.

Request

fetch("https://testsite.sharepoint.com/sites/test/_api/Microsoft.Sharepoint.Utilities.WebTemplateExtensions.SiteScriptUtility.AddSiteDesignTaskToCurrentWeb", {
    "credentials": "include",
    "headers": {
        "accept": "application/json;odata=verbose",
        "accept-language": "en-US,en;q=0.9",
        "content-type": "application/json;odata=verbose",
        "x-requestdigest": "YourXRequestDigest"
    },
    "referrer": "https://testsite.sharepoint.com/sites/test",
    "referrerPolicy": "no-referrer-when-downgrade",
    "body": "{\"siteDesignId\":\"38ef12db-e8b8-4716-96d9-7556c61bf98b\"}",
    "method": "POST",
    "mode": "cors"
});

Response

{
    "d": {
        "AddSiteDesignTaskToCurrentWeb": {
            "__metadata": {
                "type": "Microsoft.SharePoint.Utilities.WebTemplateExtensions.SiteDesignTask"
            },
            "ID": "b86f5a1c-c153-4ff9-b17f-c9c123ee9249",
            "LogonName": "i:0#.f|membership|beau@cameronsoft.onmicrosoft.com",
            "SiteDesignID": "38ef12db-e8b8-4716-96d9-7556c61bf98b",
            "SiteID": "2636e586-47e2-4644-9b01-88f73b397e9e",
            "WebID": "7ccf233e-97e6-46bc-9101-3607e1b221ba"
        }
    }
}

If you’d like to see which site designs have been applied to this site or want to see the success of each action within this invocation, you can follow this post which shows examples using REST and PowerShell.

Have really long site scripts?

What happens if you have site scripts that are over 300 actions, and the current framework will not support it? A tip  is to break the site scripts out into multiple site designs and call them via flow. Check out Reza Dorrani’s blog showing how to do this.

Setting the new page header in a modern SharePoint page using C# or PowerShell

This week a question came up about how to set the Header in a modern page using code. Normally in these cases you could go to the PnP Provisioning library. Using the PnP Schema you can provision a page and specify some properties of the header that shows up when deployed. You can specify:

  • Title
  • ServerRelativeImageUrl
  • Translate X
  • Translate Y

Unfortunately, there has been some updates to the modern pages which allows for a new layout for headers and the current PnP library doesn’t have support for them yet. Notice the image below, we have a few new layouts and a new field called “Topic Header”.

So what I am going to do, is explain how we can achieve the new layout with the Topic Header field. I looked into the existing PnP codebase to see how the current header implementation was done, and it gave me a lot of insight into how to solve this problem.

How to achieve this

In order to create a new page and specify a new page header we actually have to create a new page in the Site Pages list and then update some of the hidden properties of the site page. Specifically we need to update the following fields:

  • LayoutWebpartsContent
  • PageLayoutType
  • CanvasContent1
  • _TopicHeader
  • ClientSideApplicationId

Where do the properties for a header live?

The thing about modern web parts is that a lot of them store the properties that are being rendered within the web part itself. Because of this, I actually have to set the HTML and JSON object of the web part on the site page’s LayoutsWebpartsContent field. It’s quite complex, so in order to be as safe as possible and get the correct HTML, I decided the best approach  would be to create a template page (pictured above) and use that as a way to get the proper data for my newly provisioned pages.

C# Implementation

This C# example is actually going to use the PnP Core library (not required). We’ll get a reference to my template page and grab the LayoutWebpartsContent property. This will return all of the HTML required for the header. Then, we’ll create a new article page, update a few required properties and then update the LayoutWebpartsContent property from the template values.

Link to gist

  using (var ctx = new OfficeDevPnP.Core.AuthenticationManager().GetAppOnlyAuthenticatedContext(newSiteUrl, clientId, clientSecret))
            {
                var pages = ctx.Web.Lists.GetByTitle("Site Pages");
                ctx.Load(pages);
                
                //get template page
                var templatePage = pages.RootFolder.GetFile("Project-Home.aspx").ListItemAllFields;
                ctx.Load(templatePage);
                ctx.ExecuteQuery();
                
                //this is our template page content
                var _customPageHeader = templatePage[ClientSidePage.PageLayoutContentField]; //LayoutWebpartsContent
                var _canvasContent = templatePage["CanvasContent1"];

                //create new page in site page library
                var item = pages.RootFolder.Files.AddTemplateFile("/sites/test/sitepages/BeauTest.aspx", TemplateFileType.ClientSidePage).ListItemAllFields;
              
               //update page header from template information
                item[ClientSidePage.PageLayoutContentField] = _customPageHeader;        
                item[ClientSidePage.ClientSideApplicationId] = ClientSidePage.SitePagesFeatureId; //ClientSideApplicationId - b6917cb1-93a0-4b97-a84d-7cf49975d4ec
                item["CanvasContent1"] = _canvasContent; //"

“; item[“_TopicHeader”] = “Service Line”; item.Update(); ctx.Load(item); ctx.ExecuteQuery(); }


PowerShell Implementation

The following example is the equivalent of the C# code using CSOM, and instead of using a template file, I’ve hard coded the HTML into the code itself. This way, if you wanted to add some tokens in your HTML to dynamically replace the “Topic Header”, or change the layout you could do so directly in that HTML string.

Link to Gist

[System.Reflection.Assembly]::LoadWithPartialName("Microsoft.SharePoint.Client")
[System.Reflection.Assembly]::LoadWithPartialName("Microsoft.SharePoint.Client.Runtime")
 

$admin = 'youraccount@tenant.OnMicrosoft.Com'
$password = Read-Host 'Enter Password' -AsSecureString

$context = New-Object Microsoft.SharePoint.Client.ClientContext("https://tenant.sharepoint.com/sites/testpnp");
$credentials = New-Object Microsoft.SharePoint.Client.SharePointOnlineCredentials($admin , $password)
$context.Credentials = $credentials


$pagesLibrary = $context.Web.Lists.GetByTitle('Site Pages');
$context.Load($pagesLibrary);

$newPageitem = $pagesLibrary.RootFolder.Files.AddTemplateFile("/sites/testpnp/sitepages/TestPage.aspx", "ClientSidePage").ListItemAllFields;

$newPageitem["Title"] = "Project Home";
$newPageitem["ClientSideApplicationId"] = "b6917cb1-93a0-4b97-a84d-7cf49975d4ec";
$newPageitem["PageLayoutType"] = "Article";
$newPageitem["LayoutWebpartsContent"] = '
'; $newPageitem["CanvasContent1"] = "
"; $newPageitem["_TopicHeader"] = "Service Line"; $newPageitem.Update(); $context.Load($newPageitem); $context.ExecuteQuery();


A special thanks

I’d like to thank Garry Trinder for mentioning the current limitation and providing me with the idea on figuring out how to solve this issue and subsequently creating this post!

Thanks to the PnP Team for setting up a lot of the framework and for making this post possible. Sharing is caring.

How to find which site designs have been applied on a SharePoint site.

In SharePoint Online, a new provisioning process is being used which allows an administrator to define a set of designs that can be applied to a newly created site. These site designs consist of the ability add column, lists, specify themes, apply SPFx solutions and more.

It’s important to note that multiple site designs can be applied to a site in SharePoint online.

How site designs can be applied to a site collection

  • During creation of a new site using the SharePoint UI
  • During the association to a hub site
  • Invoking on an existing site using Invoke-SPOSiteDesign and Add-SPOSiteDesignTask

Because site designs can be applied in multiple ways and more than one site design can be applied to a site, an admin may want to have a way to see which site designs have been invoked onto a site.

Introducing Get-SPOSiteDesignRun (PowerShell)

Get-SPoSiteDesignRun is a new command available to the SharePoint Online Management Shell that will show which site designs have been applied to a specific site collection.

$siteDesignsRan = Get-SPOSiteDesignRun -WebUrl "https://yoursite.sharepoint.com/sites/testsite"

Id                : e4ff3264-c7b1-4121-b179-445382216703
SiteDesignId      : d082fc0e-9a49-4675-88ac-d49e0931670e
WebId             : 42a2b14c-ce2a-485e-8854-92d3b334704f
SiteId            : f848c5a3-9c6b-40f6-becd-8c5661f0e558
SiteDesignVersion : 1
SiteDesignTitle   : Long Site Design

Id                : 8efb3528-3ff1-4dcf-98a3-7f020492a79f
SiteDesignId      : d082fc0e-9a49-4675-88ac-d49e0931670e
WebId             : 42a2b14c-ce2a-485e-8854-92d3b334704f
SiteId            : f848c5a3-9c6b-40f6-becd-8c5661f0e558
SiteDesignVersion : 1
SiteDesignTitle   : Long Site Design

Id                : 00000000-0000-0000-0000-000000000000
SiteDesignId      : 7da58b45-b11d-4e3c-940b-a96c925d02be
WebId             : 42a2b14c-ce2a-485e-8854-92d3b334704f
SiteId            : f848c5a3-9c6b-40f6-becd-8c5661f0e558
SiteDesignVersion : 1
SiteDesignTitle   : MMD Test

Notice the first two site designs that were run, are actually the same. This is because not only does this command show all site designs applied, it also shows the history of invocations against this site collection. Using Invoke-SPOSiteDesign or Add-SPOSiteDesignTask. More information on Add-SPOSiteDesignTask can be found in my previous post.

Needing more information

Get-SPOSiteDesignRun is a valuable command, but as an administrator you may not know what each site design has implemented and the history of actions taken in the site collection. To do this, you can use the new Get-SPOSiteDesignRunStatus command and it will return the result of each action from every site script in your site design.

In the command above, I got a list of site designs that have been invoked onto a site collection and stored them in an object called $siteDesignsRan. I can use the Get-SPOSiteDesignRunStatus command to find more information about each site design invocation.

Get-SPOSiteDesignRunStatus -Run $siteDesignsRan[1]

OrdinalIndex    : 0
SiteScriptID    : 0aa8ce3a-0a7f-4963-bd0f-07ce28a6a5dd
SiteScriptTitle : LongSiteScript
SiteScriptIndex : 0
ActionIndex     : 0
ActionTitle     : Create site column MyTestMMD2TaxHTField through XML
ActionKey       : 00000000-0000-0000-0000-000000000000
OutcomeCode     : Success
OutcomeText     : 

OrdinalIndex    : 1
SiteScriptID    : 0aa8ce3a-0a7f-4963-bd0f-07ce28a6a5dd
SiteScriptTitle : LongSiteScript
SiteScriptIndex : 0
ActionIndex     : 1
ActionTitle     : Create site column MyTestMMD2 through XML
ActionKey       : 00000000-0000-0000-0000-000000000000
OutcomeCode     : Success
OutcomeText     : 

OrdinalIndex    : 2
SiteScriptID    : 0aa8ce3a-0a7f-4963-bd0f-07ce28a6a5dd
SiteScriptTitle : LongSiteScript
SiteScriptIndex : 0
ActionIndex     : 2
ActionTitle     : Create content type Test CT
ActionKey       : 00000000-0000-0000-0000-000000000000
OutcomeCode     : NoOp
OutcomeText     : 

OrdinalIndex    : 3
SiteScriptID    : 0aa8ce3a-0a7f-4963-bd0f-07ce28a6a5dd
SiteScriptTitle : LongSiteScript
SiteScriptIndex : 0
ActionIndex     : 2
ActionTitle     : Add site column MyTestMMD2 to content type
ActionKey       : 00000000-0000-0000-0000-000000000000
OutcomeCode     : NoOp
OutcomeText     : 

OrdinalIndex    : 4
SiteScriptID    : 0aa8ce3a-0a7f-4963-bd0f-07ce28a6a5dd
SiteScriptTitle : LongSiteScript
SiteScriptIndex : 0
ActionIndex     : 2
ActionTitle     : Add site column MyTestMMD2TaxHTField to content type
ActionKey       : 00000000-0000-0000-0000-000000000000
OutcomeCode     : NoOp
OutcomeText     : 

OrdinalIndex    : 5
SiteScriptID    : 0aa8ce3a-0a7f-4963-bd0f-07ce28a6a5dd
SiteScriptTitle : LongSiteScript
SiteScriptIndex : 0
ActionIndex     : 3
ActionTitle     : Create or update list Custom List
ActionKey       : 00000000-0000-0000-0000-000000000000
OutcomeCode     : NoOp
OutcomeText     : List with name Custom List already exists.

OrdinalIndex    : 6
SiteScriptID    : 0aa8ce3a-0a7f-4963-bd0f-07ce28a6a5dd
SiteScriptTitle : LongSiteScript
SiteScriptIndex : 0
ActionIndex     : 3
ActionTitle     : Add content type Test CT
ActionKey       : 00000000-0000-0000-0000-000000000000
OutcomeCode     : NoOp
OutcomeText     :

This is a great command that should be in every admin’s toolbox to help manage and govern SharePoint sites. It gives us a very clear history of what actions have been taken on a given site collection and the results of those actions.

If you ever have a question as to which site designs have been applied to your site, look no further than Get-SPOSiteDesignRun and Get-SPOSiteDesignRunStatus.

Using REST

The previous example was showing how to get the Site Designs applied using PowerShell.  Below is how you can get the results using REST.

Get a list of Site Designs ran on a site using REST

(POST) _api/Microsoft.Sharepoint.Utilities.WebTemplateExtensions.SiteScriptUtility.GetSiteDesignRun

Result

 
   "d": 
      "results": 
          
            "__metadata": 
               "id":"https://testsite.sharepoint.com/sites/test/_api/Microsoft.SharePoint.Utilities.WebTemplateExtensions.SiteDesignRun4eb4e8b2-ead5-4f11-a4f9-0d127b898740",
               "uri":"https://testsite.sharepoint.com/sites/test/_api/Microsoft.SharePoint.Utilities.WebTemplateExtensions.SiteDesignRun4eb4e8b2-ead5-4f11-a4f9-0d127b898740",
               "type":"Microsoft.SharePoint.Utilities.WebTemplateExtensions.SiteDesignRun"
            },
            "ID":"38ef12db-e8b8-4716-96d9-7556c61bf98b",
            "SiteDesignID":"6ebda32f-c2dc-4353-b09c-36df6652dfaa",
            "SiteDesignTitle":"Team Site Design",
            "SiteDesignVersion":1,
            "SiteID":"b6e1bf12-151e-43c7-a889-df7d1759db0f",
            "StartTime":"1535557919000",
            "WebID":"e0a62834-f04f-4f31-b2e1-6c8badf56167"
         }
      ]
   }
}

Get Information about a specific site design using REST

Using the response from the above request, you can grab the ID and pass it as the “runId” parameter to the following endpoint.

(POST) _api/Microsoft.Sharepoint.Utilities.WebTemplateExtensions.SiteScriptUtility.GetSiteDesignRunStatusAndSchema
fetch("https://testsite.sharepoint.com/sites/test/_api/Microsoft.Sharepoint.Utilities.WebTemplateExtensions.SiteScriptUtility.GetSiteDesignRunStatusAndSchema", {
    "credentials": "include",
    "headers": {
        "accept": "application/json;odata=verbose",
        "accept-language": "en-US,en;q=0.9",
        "content-type": "application/json;odata=verbose",
        "x-requestdigest": "YourXRequestDigest"
    },
    "referrer": "https://testsite.sharepoint.com/sites/test",
    "referrerPolicy": "no-referrer-when-downgrade",
    "body": "{\"runId\":\"38ef12db-e8b8-4716-96d9-7556c61bf98b\"}",
    "method": "POST",
    "mode": "cors"
});

Result

 
   "d": 
      "GetSiteDesignRunStatusAndSchema": 
         "__metadata": 
            "type":"Microsoft.SharePoint.Utilities.WebTemplateExtensions.SPSiteScriptStatusAndSchema"
         },
         "ActionStatus": 
            "__metadata": 
               "type":"Collection(Microsoft.SharePoint.Utilities.WebTemplateExtensions.SiteScriptActionStatus)"
            },
            "results": 
                
                  "ActionIndex":0,
                  "ActionKey":"00000000-0000-0000-0000-000000000000",
                  "ActionTitle":"Apply theme Black and Yellow",
                  "LastModified":"1535557920000",
                  "OrdinalIndex":0,
                  "OutcomeCode":0,
                  "OutcomeText":null,
                  "SiteScriptID":"72673672-3708-415d-b7f9-5322288dfa6c",
                  "SiteScriptIndex":0,
                  "SiteScriptTitle":"Apply Theme"
               }
            ]
         },
         "Schema":"{\"recipes\":[{\"actions\":[{\"stages\":[\"Apply theme Black and Yellow\"]}],\"recipeGuid\":\"72673672-3708-415d-b7f9-5322288dfa6c\",\"recipeName\":\"Apply Theme\"}],\"siteDesignTitle\":\"Team Site Design\",\"siteDesignVersion\":1}"
      }
   }
}


Hope this helps!

Overcome the 30 action site script limitation in SharePoint Online

This blog post pertains to invoking site designs using PowerShell and not through the SharePoint UI. Increasing the 30 action limit through the UI/UX will be supported soon!

During Ignite in Orlando this year, I had the pleasure to see Sean Squires present on the the latest and greatest features for site provisioning in SharePoint Online. He spoke about some of the future updates coming that will help get over some of the limitations of site designs and site scripts.

What 30 action limit?

When site designs and site scripts were first released, there was a limit of 30 actions that could be used in a site script. These actions include:

  • Creating a content type
  • Creating a list
  • Adding a content type to a list
  • creating list columns
  • setting regional settings
  • deploying SPFx solutions
  • and more…

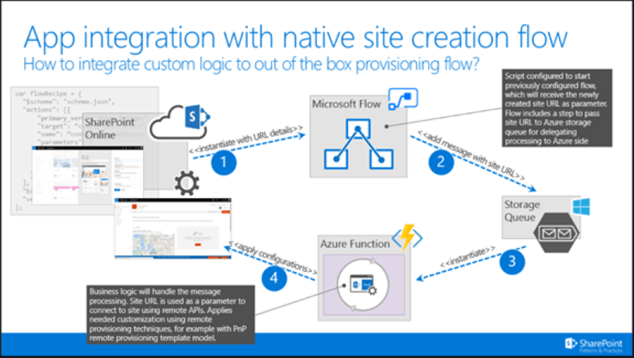
That means if you started using site scripts when they were first released and you needed to deploy a large amount of customization, you’d have to do this with PowerShell and Azure Functions using the “triggerFlow” action.

Introducing Add-SPOSiteDesignTask

During Ignite, Sean announced that new PowerShell commandlets would be available to increase this limitation from 30 to an extremely high number (100k characters apparently). The release of this has seemingly gone under the radar, but is now available for use!

Add-SPOSiteDesignTask is meant to replace the existing Invoke-SPOSiteDesign. The command is used to apply an already publishing site design to any target site collection. This means there is still a limit of 30 actions when creating sites from the SharePoint UI.

However, unlike Invoke-SPOSiteDesign, the command doesn’t run the site design immediately, instead the site design invocation is put into a schedule to run.

Testing it out

I’ve created a basic site design and site script that run 30+ actions onto a SharePoint site collection. The site script will create 33 site columns, a custom list and apply the columns to the list.

$script = @'
  {
                  "$schema": "schema.json",
                   "actions": [
                            {
                                "verb": "createSiteColumn",
                                "fieldType": "Text",
                                "internalName": "testColumn1",
                                "displayName": "Test Column1",
                                "isRequired": false
                               },
                                {
                                "verb": "createSiteColumn",
                                "fieldType": "Text",
                                "internalName": "testColumn2",
                                "displayName": "Test Column2",
                                "isRequired": false
                               },
                                {
                                "verb": "createSiteColumn",
                                "fieldType": "Text",
                                "internalName": "testColumn3",
                                "displayName": "Test Column3",
                                "isRequired": false
                               },
                                {
                                "verb": "createSiteColumn",
                                "fieldType": "Text",
                                "internalName": "testColumn4",
                                "displayName": "Test Column4",
                                "isRequired": false
                               },
                                {
                                "verb": "createSiteColumn",
                                "fieldType": "Text",
                                "internalName": "testColumn5",
                                "displayName": "Test Column5",
                                "isRequired": false
                               },
                                {
                                "verb": "createSiteColumn",
                                "fieldType": "Text",
                                "internalName": "testColumn6",
                                "displayName": "Test Column6",
                                "isRequired": false
                               },
                                {
                                "verb": "createSiteColumn",
                                "fieldType": "Text",
                                "internalName": "testColumn7",
                                "displayName": "Test Column7",
                                "isRequired": false
                               },
                                {
                                "verb": "createSiteColumn",
                                "fieldType": "Text",
                                "internalName": "testColumn8",
                                "displayName": "Test Column8",
                                "isRequired": false
                               },
                                {
                                "verb": "createSiteColumn",
                                "fieldType": "Text",
                                "internalName": "testColumn9",
                                "displayName": "Test Column9",
                                "isRequired": false
                               },
                                {
                                "verb": "createSiteColumn",
                                "fieldType": "Text",
                                "internalName": "testColumn10",
                                "displayName": "Test Column10",
                                "isRequired": false
                               },
                                {
                                "verb": "createSiteColumn",
                                "fieldType": "Text",
                                "internalName": "testColumn11",
                                "displayName": "Test Column11",
                                "isRequired": false
                               },
                                {
                                "verb": "createSiteColumn",
                                "fieldType": "Text",
                                "internalName": "testColumn12",
                                "displayName": "Test Column12",
                                "isRequired": false
                               },
                                {
                                "verb": "createSiteColumn",
                                "fieldType": "Text",
                                "internalName": "testColumn13",
                                "displayName": "Test Column13",
                                "isRequired": false
                               },
                                {
                                "verb": "createSiteColumn",
                                "fieldType": "Text",
                                "internalName": "testColumn14",
                                "displayName": "Test Column14",
                                "isRequired": false
                               },
                                {
                                "verb": "createSiteColumn",
                                "fieldType": "Text",
                                "internalName": "testColumn15",
                                "displayName": "Test Column15",
                                "isRequired": false
                               },
                                {
                                "verb": "createSiteColumn",
                                "fieldType": "Text",
                                "internalName": "testColumn16",
                                "displayName": "Test Column16",
                                "isRequired": false
                               },
                                {
                                "verb": "createSiteColumn",
                                "fieldType": "Text",
                                "internalName": "testColumn17",
                                "displayName": "Test Column17",
                                "isRequired": false
                               },
                                {
                                "verb": "createSiteColumn",
                                "fieldType": "Text",
                                "internalName": "testColumn18",
                                "displayName": "Test Column18",
                                "isRequired": false
                               },
                                {
                                "verb": "createSiteColumn",
                                "fieldType": "Text",
                                "internalName": "testColumn19",
                                "displayName": "Test Column19",
                                "isRequired": false
                               },
                                {
                                "verb": "createSiteColumn",
                                "fieldType": "Text",
                                "internalName": "testColumn20",
                                "displayName": "Test Column20",
                                "isRequired": false
                               },
                                {
                                "verb": "createSiteColumn",
                                "fieldType": "Text",
                                "internalName": "testColumn21",
                                "displayName": "Test Column21",
                                "isRequired": false
                               },
                                {
                                "verb": "createSiteColumn",
                                "fieldType": "Text",
                                "internalName": "testColumn22",
                                "displayName": "Test Column22",
                                "isRequired": false
                               },
                                {
                                "verb": "createSiteColumn",
                                "fieldType": "Text",
                                "internalName": "testColumn23",
                                "displayName": "Test Column23",
                                "isRequired": false
                               },
                                {
                                "verb": "createSiteColumn",
                                "fieldType": "Text",
                                "internalName": "testColumn24",
                                "displayName": "Test Column24",
                                "isRequired": false
                               }, {
                                "verb": "createSiteColumn",
                                "fieldType": "Text",
                                "internalName": "testColumn25",
                                "displayName": "Test Column25",
                                "isRequired": false
                               },
                                {
                                "verb": "createSiteColumn",
                                "fieldType": "Text",
                                "internalName": "testColumn26",
                                "displayName": "Test Column26",
                                "isRequired": false
                               },
                                {
                                "verb": "createSiteColumn",
                                "fieldType": "Text",
                                "internalName": "testColumn27",
                                "displayName": "Test Column27",
                                "isRequired": false
                               },
                                {
                                "verb": "createSiteColumn",
                                "fieldType": "Text",
                                "internalName": "testColumn28",
                                "displayName": "Test Column28",
                                "isRequired": false
                               }, {
                                "verb": "createSiteColumn",
                                "fieldType": "Text",
                                "internalName": "testColumn29",
                                "displayName": "Test Column29",
                                "isRequired": false
                               },
                                {
                                "verb": "createSiteColumn",
                                "fieldType": "Text",
                                "internalName": "testColumn30",
                                "displayName": "Test Column30",
                                "isRequired": false
                               },
                                {
                                "verb": "createSiteColumn",
                                "fieldType": "Text",
                                "internalName": "testColumn31",
                                "displayName": "Test Column31",
                                "isRequired": false
                               },
                                {
                                "verb": "createSiteColumn",
                                "fieldType": "Text",
                                "internalName": "testColumn32",
                                "displayName": "Test Column32",
                                "isRequired": false
                               },
                                {
                                "verb": "createSiteColumn",
                                "fieldType": "Text",
                                "internalName": "testColumn33",
                                "displayName": "Test Column33",
                                "isRequired": false
                               },
                        {
                           "verb": "createContentType",
                           "name": "Test CT",
                           "description": "custom content type",
                           "parentName": "Item",
                           "hidden": false,
                           "subactions": [                         
                               {
                               "verb": "addSiteColumn",
                               "internalName":"testColumn1"
                               },
                               {
                               "verb": "addSiteColumn",
                               "internalName":"testColumn2"
                               },
                               {
                               "verb": "addSiteColumn",
                               "internalName":"testColumn3"
                               },
                               {
                               "verb": "addSiteColumn",
                               "internalName":"testColumn4"
                               },
                               {
                               "verb": "addSiteColumn",
                               "internalName":"testColumn5"
                               },
                               {
                               "verb": "addSiteColumn",
                               "internalName":"testColumn6"
                               },
                               {
                               "verb": "addSiteColumn",
                               "internalName":"testColumn7"
                               },{
                               "verb": "addSiteColumn",
                               "internalName":"testColumn8"
                               },
                               {
                               "verb": "addSiteColumn",
                               "internalName":"testColumn9"
                               },{
                               "verb": "addSiteColumn",
                               "internalName":"testColumn10"
                               },
                               {
                               "verb": "addSiteColumn",
                               "internalName":"testColumn11"
                               },{
                               "verb": "addSiteColumn",
                               "internalName":"testColumn12"
                               },
                               {
                               "verb": "addSiteColumn",
                               "internalName":"testColumn13"
                               },{
                               "verb": "addSiteColumn",
                               "internalName":"testColumn14"
                               },{
                               "verb": "addSiteColumn",
                               "internalName":"testColumn15"
                               },
                               {
                               "verb": "addSiteColumn",
                               "internalName":"testColumn16"
                               },{
                               "verb": "addSiteColumn",
                               "internalName":"testColumn17"
                               },
                               {
                               "verb": "addSiteColumn",
                               "internalName":"testColumn18"
                               },
                               {
                               "verb": "addSiteColumn",
                               "internalName":"testColumn19"
                               },
                               {
                               "verb": "addSiteColumn",
                               "internalName":"testColumn20"
                               },
                               {
                               "verb": "addSiteColumn",
                               "internalName":"testColumn21"
                               },
                               {
                               "verb": "addSiteColumn",
                               "internalName":"testColumn22"
                               },
                               {
                               "verb": "addSiteColumn",
                               "internalName":"testColumn23"
                               },
                               {
                               "verb": "addSiteColumn",
                               "internalName":"testColumn24"
                               },
                               {
                               "verb": "addSiteColumn",
                               "internalName":"testColum25"
                               },
                               {
                               "verb": "addSiteColumn",
                               "internalName":"testColumn26"
                               },{
                               "verb": "addSiteColumn",
                               "internalName":"testColumn27"
                               },
                              {
                               "verb": "addSiteColumn",
                               "internalName":"testColumn28"
                               },
                               {
                               "verb": "addSiteColumn",
                               "internalName":"testColumn29"
                               },
                               {
                               "verb": "addSiteColumn",
                               "internalName":"testColumn30"
                               },
                               {
                               "verb": "addSiteColumn",
                               "internalName":"testColumn31"
                               },
                               {
                               "verb": "addSiteColumn",
                               "internalName":"testColumn32"
                               },
                               {
                               "verb": "addSiteColumn",
                               "internalName":"testColumn33"
                               },
                               
                            ]
                       },
                       {
                        "verb": "createSPList",
                        "listName": "Custom List",
                        "templateType": 100,
                        "subactions": [
                           {
                            "verb": "addContentType",
                            "name": "Test CT"
                           }                      
                         ]
                        }
            
              
                   ],
                   "bindata": { },
               "version": 1
              }
              
              }

}
'@

I have added this site script to SharePoint using the Add-SPOSiteScript command and subsequently added the site script to a new site design using Add-SPOSiteDesign.

Add-SPOSiteScript -Title "LongSiteScript" -Description "Long Site Script" -Content $script
-returned id = 0aa8ce3a-0a7f-4963-bd0f-07ce28a6a5dd

Add-SPOSiteDesign -Title "Long Action Site Design" -WebTemplate "0" -SiteScripts "0aa8ce3a-0a7f-4963-bd0f-07ce28a6a5dd" -Description "Long Action Test"
-return id = d082fc0e-9a49-4675-88ac-d49e0931670e

Using Add-SPOSiteDesignTask

Now that I have created a long site script and the associated site design, it’s time to run the site design on an existing site. I will invoke the site design using Add-SPOSiteDesignTask and passing in the WebUrl and the SiteDesignId from my new site design.

Add-SPOSiteDesignTask -SiteDesignId d082fc0e-9a49-4675-88ac-d49e0931670e -WebUrl https://yourtenantsite.sharepoint.com/sites/testlongscript

After invoking the command, PowerShell is going to output some information for you. It will provide the ID of the new task as well as the associated site design that was provisioned.

Add-SPOSiteDesignTask -SiteDesignId d082fc0e-9a49-4675-88ac-d49e0931670e -WebUrl https://yourtenantsite.sharepoint.com/sites/testlongscript

Id : e4ff3264-c7b1-4121-b179-445382216703
SiteDesignId : d082fc0e-9a49-4675-88ac-d49e0931670e
WebId : 42a2b14c-ce2a-485e-8854-92d3b334704f
SiteId : f848c5a3-9c6b-40f6-becd-8c5661f0e558
LogonName : i:0#.f|membership|beau@cameronsoft.onmicrosoft.com

Checking the results

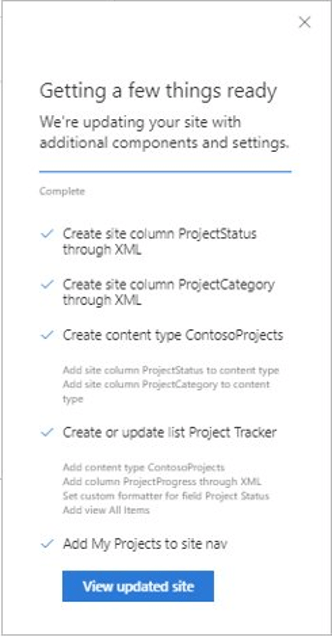
After waiting a minute or so, I was able to see the reflected changes in my environment.

ContentType

To learn more about Add-SPOSiteDesignTask, the documentation can be found here.

Deploy Managed Metadata fields using site designs and site scripts

(Notice: This post may show unsupported methods for provisioning fields)

You may be in a scenario where you want to create Managed Metadata columns using modern provisioning. This post is going to outline a method that can be used to provision Managed Metadata columns using site designs. Site designs are a new model for provisioning assets (fields,content types, lists, etc…) in modern SharePoint. Information on site designs and site scripts can be found here.

Multiple ways to create columns

Using a site script,  you can create both list and site columns using two different actions — “addSPField” and “addSiteColumn”. The first will deploy a list column and the second action will deploy a site column. However, these two actions only support basic field types in SharePoint. These field types include:

  • Text
  • Note
  • Number
  • Boolean
  • User
  • DateTime

Complex columns such as people fields and managed metadata fields need to be created using the Field Element definition. Using site designs and site scripts, we can provision complex fields using the Field definition with the addSPFieldXml and createSiteColumnXML actions.

There are many ways you can get the Field definition after they have been created in the SharePoint UI. Here are a couple options you could use to export out the schema XML for a list and get the field definitions.

https://yoursite/_vti_bin/owssvr.dll?Cmd=ExportList&List={YOUR_LIST_GUID}

You could also use PnP PowerShell to export out the schema

 $list = Get-PnPList -Identity "your list" -Includes SchemaXml
 $schema = $list.SchemaXml

Which complex fields are supported?

If look through the site script documentation you may notice, it doesn’t actually define which field types are supposed through XML. In regards to a complex field such as a Managed Metadata field, we took to twitter to see if Microsoft had any input. Sean Squires mentioned that currently they do not support Managed Metadata Fields, at least in an elegant way (which to me means, if it works great! if it doesn’t…it’s not officially supported).

How it can be achieved

Managed Metadata Fields are complex fields that actually require two fields to be deployed in order to function properly. One field is a TaxonomyFieldType and another is a Note field. This means we actually have to deploy two fields during the provisioning process.

When you export out a list schema and find your Managed Metadata field, you’ll notice it references the Note field using the ID of the Note field in the TextField node. You may also notice there are tokens for properties such as WebId, SiteId, ListId in your Field definition. In order for the deployment of the field to work we need to remove these token properties.

Secondly, we’ll need to update the <Property> nodes inside the <Customziation> node for the following properties.

  • SspId
  • TermSetId
  • AnchorId

By default, these properties may be using braces to identify the GUID for the Term store, Term set and Anchor. We need to remove the braces and leave the rest of the GUID string.

Here is an example of a cleaned up XML for a Managed Metadata field. Notice how I have removed the {braces} from around the GUIDs for SspdId, TermSetId and AnchorId (in bold).

<Field Type="TaxonomyFieldType" Name="MyTestMMD" SourceID="http://schemas.microsoft.com/sharepoint/v3" StaticName="MyTestMMD" DisplayName="My Test Tax" Group="Test group" ShowField="Term1033" Required="FALSE" EnforceUniqueValues="FALSE" Mult="FALSE"> <Default /> <Customization> <ArrayOfProperty> <Property> <Name>SspId</Name> <Value xmlns:p4="http://www.w3.org/2001/XMLSchema-instance" xmlns:q1="http://www.w3.org/2001/XMLSchema" p4:type="q1:string">1ba8a7c0-a373-4bb7-8ee0-2d130933743a</Value> </Property> <Property> <Name>GroupId</Name> <Value xmlns:p4="http://www.w3.org/2001/XMLSchema-instance" xmlns:q2="http://www.w3.org/2001/XMLSchema" p4:type="q2:string">0e8f395e-ff58-4d45-9ff7-e331ab728beb</Value> </Property> <Property> <Name>TermSetId</Name> <Value xmlns:p4="http://www.w3.org/2001/XMLSchema-instance" xmlns:q2="http://www.w3.org/2001/XMLSchema" p4:type="q2:string">487ba508-4fba-49f1-be4f-ceee2624da0a</Value> </Property> <Property> <Name>TextField</Name> <Value xmlns:p4="http://www.w3.org/2001/XMLSchema-instance" xmlns:q6="http://www.w3.org/2001/XMLSchema" p4:type="q6:string">{44a5d269-ce40-4a8f-b0d6-6b7bcb95ff71}</Value> </Property> <Property> <Name>AnchorId</Name> <Value xmlns:p4="http://www.w3.org/2001/XMLSchema-instance" xmlns:q3="http://www.w3.org/2001/XMLSchema" p4:type="q3:string">00000000-0000-0000-0000-000000000000</Value> </Property> <Property> <Name>IsPathRendered</Name> <Value xmlns:p4="http://www.w3.org/2001/XMLSchema-instance" xmlns:q7="http://www.w3.org/2001/XMLSchema" p4:type="q7:boolean">false</Value> </Property> <Property> <Name>IsKeyword</Name> <Value xmlns:p4="http://www.w3.org/2001/XMLSchema-instance" xmlns:q8="http://www.w3.org/2001/XMLSchema" p4:type="q8:boolean">false</Value> </Property> <Property> <Name>Open</Name> <Value xmlns:p4="http://www.w3.org/2001/XMLSchema-instance" xmlns:q5="http://www.w3.org/2001/XMLSchema" p4:type="q5:boolean">false</Value> </Property> </ArrayOfProperty> </Customization> </Field>

A couple notes

If you fail to do this successfully, it may look like your column is working. However, SharePoint will not create managed or crawled properties correctly, thus making your column not searchable.

Final site script actions

The next thing we want to do is escape the XML so can we can use it inside a JSON site script. Then finally, we can add the Field definitions to our site script using the “createSiteColumnXml” action.

Here is an example of the two site script actions required to deploy a Managed Metadata field using site designs.

 {
   "verb": "createSiteColumnXml",  
    "schemaXml": "<Field ID=\"{44a5d269-ce40-4a8f-b0d6-6b7bcb95ff71}\" SourceID=\"http:\/\/schemas.microsoft.com\/sharepoint\/v3\" Type=\"Note\" Name=\"MyTestMMDTaxHTField\" StaticName=\"MyTestMMDTaxHTField\" DisplayName=\"MyTestMMDTaxHTField\" Group=\"Test group\" ShowInViewForms=\"FALSE\" Required=\"FALSE\" Hidden=\"TRUE\" CanToggleHidden=\"TRUE\" />"  
 },   
 {  
  "verb": "createSiteColumnXml",  
  "schemaXml": "<Field Type=\"TaxonomyFieldType\" Name=\"MyTestMMD\" SourceID=\"http:\/\/schemas.microsoft.com\/sharepoint\/v3\" StaticName=\"MyTestMMD\" DisplayName=\"My Test Tax\" Group=\"Test group\" ShowField=\"Term1033\" Required=\"FALSE\" EnforceUniqueValues=\"FALSE\" Mult=\"FALSE\"> <Default></Default> <Customization> <ArrayOfProperty> <Property> <Name>SspId</Name> <Value xmlns:q1=\"http://www.w3.org/2001/XMLSchema\" p4:type=\"q1:string\" xmlns:p4=\"http://www.w3.org/2001/XMLSchema-instance\">1ba8a7c0-a373-4bb7-8ee0-2d130933743a</Value> </Property> <Property> <Name>GroupId</Name> <Value xmlns:q2=\"http://www.w3.org/2001/XMLSchema\" p4:type=\"q2:string\" xmlns:p4=\"http://www.w3.org/2001/XMLSchema-instance\">0e8f395e-ff58-4d45-9ff7-e331ab728beb</Value> </Property> <Property> <Name>TermSetId</Name> <Value xmlns:q2=\"http://www.w3.org/2001/XMLSchema\" p4:type=\"q2:string\" xmlns:p4=\"http://www.w3.org/2001/XMLSchema-instance\">487ba508-4fba-49f1-be4f-ceee2624da0a</Value> </Property> <Property> <Name>TextField</Name> <Value xmlns:q6=\"http://www.w3.org/2001/XMLSchema\" p4:type=\"q6:string\" xmlns:p4=\"http://www.w3.org/2001/XMLSchema-instance\">{44a5d269-ce40-4a8f-b0d6-6b7bcb95ff71}</Value> </Property> <Property> <Name>AnchorId</Name> <Value xmlns:q3=\"http://www.w3.org/2001/XMLSchema\" p4:type=\"q3:string\" xmlns:p4=\"http://www.w3.org/2001/XMLSchema-instance\">00000000-0000-0000-0000-000000000000</Value> </Property> <Property> <Name>IsPathRendered</Name> <Value xmlns:q7=\"http://www.w3.org/2001/XMLSchema\" p4:type=\"q7:boolean\" xmlns:p4=\"http://www.w3.org/2001/XMLSchema-instance\">false</Value> </Property> <Property> <Name>IsKeyword</Name> <Value xmlns:q8=\"http://www.w3.org/2001/XMLSchema\" p4:type=\"q8:boolean\" xmlns:p4=\"http://www.w3.org/2001/XMLSchema-instance\">false</Value> </Property> <Property> <Name>Open</Name> <Value xmlns:q5=\"http://www.w3.org/2001/XMLSchema\" p4:type=\"q5:boolean\" xmlns:p4=\"http://www.w3.org/2001/XMLSchema-instance\">false</Value> </Property> </ArrayOfProperty> </Customization> </Field>"  
  },

You can see a full site script in this Gist.

Caveats & “uh ohs”

Using the site script actions above, you should be able to successfully create Managed Metadata fields using site designs. Just be aware that if you see some negative impacts when provisioning these…they are not fully supported by Microsoft.

Augment SharePoint site provisioning with messaging in real-time with Socket.io

Modern provisioning in SharePoint has taken on a new framework called Site designs. Site designs are like templates in that they can be used each time a new site is created in your Office 365 tenancy. A site design is essentially a list of actions (site scripts) that you want SharePoint to execute when creating new sites. These actions may include:

  • Creating a new list or library (or modifying the default one created with the site)
  • Creating site columns, content types, and configuring other list settings
  • Applying a theme
  • Setting a site logo
  • Adding navigation
  • Triggering a Microsoft Flow
  • Installing a deployed solution from the app catalog
  • Setting regional settings for the site
  • Setting external sharing capability for the site

Extending site designs

While site designs are continually being improved and expanded on by Microsoft, there are some gaps. From the beginning, Microsoft was aware they wouldn’t be able to fill all  gaps from the start so they allowed us to extend the out of the box provisioning using Microsoft Flow and Azure Functions using the “triggerFlow” action. To learn more about this functionality follow this PnP documentation.

Picture1.png

This model is extremely extensible and allows you to move some of the workload over to an Azure Function or Azure Automation Services to run PowerShell & C# to apply more custom provisioning artifacts such as pre-configured pages and web parts.

No Messaging?

Currently there is a limitation using this model. Given that the provisioning process has moved off into Azure, we are unable to notify the user what the current stage the Azure Function is currently running at.

Here is what the current messaging system looks like

Picture2.png

I’ve been told that that ability to provide our own messaging into this dialog is “coming”, but currently I wanted to overcome this limitation.

Clippy is back!

Months ago when SPFx application customizers were released I jokingly built a Clippy extension to run on modern SharePoint pages. The goal was to show how to call Microsoft Graph from an application customizer.

Clippy.png

I thought I would supercharge the functionality of Clippy by connecting him to the site design provisioning process.

Socket.io + Express

In order to do this, I had to come up with a mechanism for providing Clippy real-time updates during the provisioning process. I had recently started playing around with Socket.io and I believed this would be the best route forward.

I implemented Socket.io inside an Express api which is currently living up in the Azure. The plan is use this Socket.io as a messaging relay between the Azure Functions and my Clippy extension.

This is what the new flow looks like

NewFlow

We start with a site design that sends the new site URL to Microsoft Flow. Microsoft Flow will pick up that trigger and send an HTTP request to a Durable Azure Function orchestrator in Azure.

The Durable Azure Function orchestrator allows me to split out provisioning tasks (create lists, create pages, provision navigation, apply branding) while at the same time, maintaining state across my Azure Function tasks. As the provisioning is happening, I will send updates to Socket.io.

The Socket.io will receive the message from the Azure Function and update Clippy in real-time in SharePoint.

Socket.IO Configuration

Connection

In order to configure Socket.io to be the messaging system, I had to make sure I was working with individual clients and not broadcasting messages across all Clippy extensions in my tenancy. To do this, I am emitting from Clippy a “room” name. This room is the siteURL of the current site Clippy is running.

ioconnect

By doing this, whenever  I send a message from Socket.io to Clippy, I know exactly where to send it to.

Messaging

Messaging to Clippy is done through a POST request to Socket.Io The POST request contains a message, the provisioning status (complete/running) and the URL (unique identifier for the room). I take these parameters and emit the message to the Clippy extensions where room name is equal to the Site URL.

POstMessage

Clippy Configuration

Configuring Clippy is quite simple, it’s as easy as connecting to Socket.io in Azure and subscribing to the “emit” events.

Inside the _renderPlaceHolders() function of my application customizer, I am going to create a new Clippy and register to Socket.io

ClippyRegister

Inside the _registerSocketIO, I instantiate a new socket request to Socket.io. Once connected, I am going to send a message with my “room” name. This room name is going to be uniquely identified by the siteUrl of the current site being provisioned.

regiserIO

I have two basic actions I am subscribing to — “provisioningUpdate” and “provisioningComplete”. When Socket.io receives a message and broadcasts that, Clippy will pick it up and “speak” to the user the current update from provisioning.

The Azure Function

As previously mentioned, I am using a Durable Function to do the provisioning process. To learn about Durable Functions follow this link.  Here is what the Orchestrator tasks looks like.

Asure Function Design.png

Notice that I am passing in the siteUrl coming from my Microsoft Flow HTTP trigger. Inside, I have a couple tasks that are running.

  • Establish site as a hub site
  • Provisioning Lists
  • Provision Pages
  • Provision Terms

Also notice that I have an _emitUpdate() function which is running before and after my asynchronous tasks. During the provisioning process, this _emitUpdate is going to POST a message to Socket.io.

What a task looks like

Let’s take a look at what an individual task looks like.

ProvisionLists

My Azure Function task is going to create a new AppOnly context to SharePoint, load a provisioning template that contains a set of lists to be created and uses ApplyProvisioningTemplate(template) to apply the template to my site.

Inside _emitUpdate

My _emitUpdate is fairly simple. It’s going to take a message from the Orchestrator, create a new HttpClient and execute a POST message to my Socket.io with the current status of the provisioning process.

emitUpdate

Putting it together

Without going to deep into this (because it really is more high level education than anything)… let’s see what these messages look like in real time.

If Gif is missing… wait for it to load. Full size view can be found here.

ClippyProvision-min (1)

Want to learn more?

If you are looking to learn more about how I put this together, join me at SharePoint Saturday Denver on October 6th and I’ll be also be demoing this solution at SharePoint Saturday New England! Sign up!

How To: Create Modern SharePoint site templates using Office 365 Site Designs

One of the biggest questions I see is, “How do we create site templates using Office 365 groups?”. It is no surprise that site templates were one of the most widely used features in previous versions of SharePoint. Site templates give site owners and SharePoint admins a way to incorporate some governance into the creation of team sites and expedite the creation process. However, this out-of-the-box functionality, until recently wasn’t available for new modern sites.  In this blog we’ll step through creating our own using an Office 365 group.


Before we begin you should be aware that we no longer call them “site templates”. In the modern SharePoint world, Microsoft has chosen to designate the names “site designs” for modern templating. So if you find yourself needing to search google, keep this in mind.

Secondly, site designs aren’t the only way to create templated sites within SharePoint. A very common and community driven framework known as PnP Provisioning it also a very common way to create templates and provision new sites into your Office 365 & SharePoint environments. If you would like to know the difference’s between site designs and PnP Provisioning please check out Chris O’Brien’s recent post.


A walk through

The Site Script

The first step to creating a modern site template is to create a site script using a JSON file. A site script is a file that defines that actions that SharePoint will run when a user selects your site design. Site scripts are provisioned using SharePoint Online Management Shell. For this example, we are going to create a new department team site template to be used within an Office365 Group. However, we will be adding in some PnP scripts to add a global navigation using the SharePoint Framework to the newly created site. To learn more about what actions are available, click here


   {
 "$schema": "schema.json",
     "actions": [
                    {
           "verb": "applyTheme",
           "themeName": "Custom Black"
         },
         {
             "verb": "createSPList",
             "listName": "Team Projects",
             "templateType": 100,
             "subactions": [
                 {
                     "verb": "SetDescription",
                     "description": "List to hold Team Project Statuses"
                 },
                 {
                     "verb": "addSPField",
                     "fieldType": "Text",
                     "displayName": "Project Status",
                     "addToDefaultView": true,
                     "isRequired": true
                 },
                 {
                     "verb": "addSPField",
                     "fieldType": "User",
                     "displayName": "Project Manager",
                     "addToDefaultView": true,
                     "isRequired": true
                 },
                 {
                     "verb": "addSPField",
                     "fieldType": "Note",
                     "displayName": "Project Notes",
                     "isRequired": false
                 }
             ]
         },
         {
            "verb":"triggerFlow",
            "url":"THIS-IS-THE-URL-TO-YOUR-FLOW",
            "name":"Provision Assets for Group",
            "parameters":{
                "event":"",
                "product":""
            }
         },
         {
            "verb":"setSPFieldCustomFormatter",
            "fieldDisplayName":"Project Status",
            "formatterJSON":{
    "elmType": "div",
    "txtContent": "@currentField",
    "style": {
        "color": "#fff",
        "padding-left": "14px",
        "background-color": {
            "operator": "?",
            "operands": [
                {
                    "operator": "==",
                    "operands": [
                        "@currentField",
                        "Red"
                    ]
                },
                "#e81123",
                {
                    "operator": "?",
                    "operands": [
                        {
                            "operator": "==",
                            "operands": [
                                "@currentField",
                                "Green"
                            ]
                        },
                        "#00B294",
                        {
                            "operator": "?",
                            "operands": [
                                {
                                    "operator": "==",
                                    "operands": [
                                        "@currentField",
                                        "Amber"
                                    ]
                                },
                                "#ff8c00",
                                {
                                    "operator": "?",
                                    "operands": [
                                        {
                                            "operator": "==",
                                            "operands": [
                                                "@currentField",
                                                "Yellow"
                                            ]
                                        },
                                        "#fff100",
                                        ""
                                    ]
                                }
                            ]
                        }
                    ]
                }
            ]
        }
    }
}
         }
     ],
         "bindata": { },
 "version": 1
}


In this scenario, we will be using the following actions:

createSPList

This action will create a new list named “Team Projects”. It will also create associated columns pertaining to a typical project.

addSPField

This action will create those new fields on the Team Projects list.

applyTheme

This action will apply a created theme (either out of the box, or a custom one using the new fabric theme generator) and apply it to the newly created site.

triggerFlow

This action is going to fire off a Microsoft Flow, passing the URL of the newly created site. The flow will trigger an Azure Function which is going to provision some SPFx components using PnP PowerShell.

setSPFieldCustomFormatter

This action is going to apply a JSON object for the Column Formatter to apply on the Team Projects list.


Create a Theme

Creating a theme for a modern site is a little bit different than we’ve done in the past using composed looks in classic SharePoint. We are going to want to use the new Theme Generator when creating themes for modern sites. This generator, though limited at the time, allows us to modify a primary color, body color and a background color.

ThemeBuilder.png

Start by playing around with the color selectors. You’ll notice that at the bottom, the Fabric Palette will change colors and you can see how some fonts and controls will be themed when loaded into your SharePoint site. I am going to build a black and yellow theme. You’ll also notice it gives you a specified output in JSON,SASS and PowerShell. These will be used depending on how we upload the new theme to SharePoint — in our scenario, we’ll be using PowerShell.

Copy the contents of the PowerShell output and open up PowerShell. We’ll provision the new theme to our environment using the SharePoint Online Management Shell. For more detailed information on this process, please follow this post. To provision the theme, we’ll connect to our tenant and then using the Add-SPOTheme command we’ll provision the JSONObject


    $themepallette = @{
  "themePrimary" = "#00ffff";
  "themeLighterAlt" = "#f3fcfc";
  "themeLighter" = "#daffff";
  "themeLight" = "#affefe";
  "themeTertiary" = "#76ffff";
  "themeSecondary" = "#39ffff";
  "themeDarkAlt" = "#00c4c4";
  "themeDark" = "#009090";
  "themeDarker" = "#005252";
  "neutralLighterAlt" = "#f8f8f8";
  "neutralLighter" = "#f4f4f4";
  "neutralLight" = "#eaeaea";
  "neutralQuaternaryAlt" = "#dadada";
  "neutralQuaternary" = "#d0d0d0";
  "neutralTertiaryAlt" = "#c8c8c8";
  "neutralTertiary" = "#a6a6a6";
  "neutralSecondaryAlt" = "#767676";
  "neutralSecondary" = "#666666";
  "neutralPrimary" = "#333";
  "neutralPrimaryAlt" = "#3c3c3c";
  "neutralDark" = "#212121";
  "black" = "#000000";
  "white" = "#fff";
  "primaryBackground" = "#fff";
  "primaryText" = "#333"
 }
 
Connect-SPOService -Url https://yoursharepoint-admin.sharepoint.com
Add-SPOTheme -Name "Custom Black" -Palette $themepallette -IsInverted $false

If you have a good eye, you’ll notice the -Name parameter is also the same name that is in the applyTheme action of my site script. This will be the new theme we provision when our new Site Design runs.

If you are wondering where this theme shows up, navigate to your SharePoint site, hit the gear in the top right and select Change the look. You’ll see your new theme!

ThemeChangeTheLook.png


Package and Upload SharePoint Framework Navigation

The reason I am deploying a custom global navigation solution is because Hub Sites currently do not exist in Office 365 tenants. So in the meantime, I’d still like to apply a global navigation across all of my sites that I create so that they feel “connected” in the new flat structure.

The first thing you will want to do is head over to the SharePoint extensions GitHub and pull down Paolo’s global navigation application customizer. This SPFx solution, is a global navigation menu that is injected into the header (and/or footer) of your SharePoint sites. It is a tenant-wide deployment, which means it will automatically be available to all site collections without having to add the app through site contents. The documentation provided should give you all the information required to set this up. If you need information on how to build customizations using SPFX, start here.

I have downloaded and built the SharePoint Framework solution and uploaded it to my app catalog within my tenancy. The next thing I need to do, is configure a global navigation that I want all of my modern sites to use and then we’ll proceed to creating some PowerShell scripts.

TermStore


Create Azure Function & Call PnP to provision Global Navigation

As mentioned previously, we’ll be calling an Azure Function via the Microsoft Flow trigger. There are a couple ways to do this, either by setting up a Queue Function using App Authentication, or you configure your Azure Function to grab your credentials from environment variables. The preferred method is to set up your credentials using App-Only authentication as outlined in that blog post. You’ll want to use this post to figure out how to add PnP Modules to your Azure Function. In my scenario, I am actually going to set up an HTTPTrigger Azure Function because why not show a different example… and also because I may have a need to call this function directly in other scenarios.

Below is my Azure Function PowerShell. The PowerShell code is also available on Paolo’s github for the menu.


    #incoming webUrl from the Microsoft Flow call
    # POST method: $req
    $requestBody = Get-Content $req -Raw | ConvertFrom-Json
    $name = $requestBody.name
    
    # GET method: each querystring parameter is its own variable
    if ($req_query_name) 
    {
        $webUrl = $req_query_name 
    }

    Connect-PnPOnline -AppId $env:SPO_AppId -AppSecret $env:SPO_AppSecret -Url $webUrl
    
    $context = Get-PnPContext
    $web = Get-PnPWeb
    $context.Load($web)
    Execute-PnPQuery
    
    $ca = $web.UserCustomActions.Add()
    $ca.ClientSideComponentId = "b1efedb9-b371-4f5c-a90f-3742d1842cf3"
    $ca.ClientSideComponentProperties = "{""TopMenuTermSet"":""TenantGlobalNav"",""BottomMenuTermSet"":""TenantGlobalFooter""}"
    $ca.Location = "ClientSideExtension.ApplicationCustomizer"
    $ca.Name = "TenantGlobalNavBarCustomAction"
    $ca.Title = "TenantGlobalNavBarCustomAction"
    $ca.Description = "Custom action for Tenant Global NavBar Application Custom"
    
    $ca.Update()
    
    $context.Load($web.UserCustomActions)
    Execute-PnPQuery

The code is going to recieve a parameter called webUrl and it will be the url of the new site created from my site design. This url is used in the Connect-PnPOnline command.

Create Microsoft Flow

Creating the Microsoft Flow is required because it will be the mechanism for which we pass a webUrl parameter to our azure function (we can’t call an Azure Function directly from a site script).The flow will consist of two actions: When a HTTP request is received and a HTTP requestAs previously mentioned, most tutorials will likely show you using flow to add a message to an Azure queue. I will be calling the Azure Function directly.

Use this JSON to place into your body JSON for your Http Request received 


    {
    "type": "object",
    "properties": {
        "webUrl": {
            "type": "string"
        },
        "parameters": {
            "type": "object",
            "properties": {
                "event": {
                    "type": "string"
                },
                "product": {
                    "type": "string"
                }
            }
        }
    }

}


Here is the full Flow. You need to grab the Uri to your Azure Function. You can get this URL by opening up your Azure Function and selecting </> Get function url in the top right of your code window.

Flow.png

You’ll notice that inside the body of the HTTP request, I am passing a parameter called webUrl, which is equal to the web url of the new site I am creating. This property comes through within the Flow request.


Update triggerFlow action in site script

Now that we have configured our Flow and our Azure Function, we need to connect the Flow to the site script (JSON file above). To do this, copy the Flow URL, When a HTTP request is received in your Flow (it’s outlined in grey in the image).

Copy and paste this into our site script in the triggerAction verb like so:

OLD

    
         {
            "verb":"triggerFlow",
            "url":"THIS-IS-THE-URL-TO-YOUR-FLOW",
            "name":"Provision Assets for Group",
            "parameters":{
                "event":"",
                "product":""
            }
         }
         

NEW


          {
            "verb":"triggerFlow",
            "url":"https://prod-06.westus.logic.azure.com:443/workflows....",
            "name":"Provision Assets for Group",
            "parameters":{
                "event":"",
                "product":""
            }
         }

Upload site script and site design

That’s it! The only thing left to do is add the site script and site design using PowerShell. I have created the site script and saved it into a JSON file called SiteScriptProvisionGlobalNav.json.

Add-SPOSIteScript


    Connect-SPOService -Url 'https://yourtenant-admin.sharepoint.com'
    #get JSON content and add site script
    Get-Content 'C:\Users\Me\SiteScriptProvisionGlobalNav.json'-Raw | Add-SPOSiteScript  -Title "Aerie Team Site"
    

Running this in PowerShell will return the ID of the new site script. We’ll use this ID to add the site design to the tenant. Notice -SiteScripts parameter is equal to the ID of the newly uploaded site script and -WebTemplate is “64”. The value 64 represents an Office 365 Group and the value 68 would represent a communication site.

Add-SPOSiteDesign


Add-SPOSiteDesign -Title "Aerie Team Site" -WebTemplate "64" -SiteScripts "7a5c6fd8-0953-4381-a04d-6a4400448d0c" -Description "Creates a new Aerie Team Template Site with Global Nav"-PreviewImageUrl "https://mytenant.sharepoint.com/SiteAssets/logo.jpeg" -PreviewImageAltText "site preview"


Add your team site!

Finally, the last thing to do is create your new team site from your site design and watch the magic happen!

Navigate to the /_layouts/15/SharePoint.aspx page and select + Create Site

Site Slection

Remember that we’ll be selecting a team site. On the next window, we should see our new site design.

TeamSiteCreation

After clicking next and finish, we should start seeing our site script do it’s work. It will start by applying our Custom Black theme, creating a new Team Projects list and subsequently triggering a flow to add global navigation to our newly created site

SideWindow


Now check out the final product! We have a newly created group site, with a SPFx global navigation menu in the header of the site!

Black